At a glance
Understanding the prevalence of azole-resistant Aspergillus fumigatus in patients is important to guide clinical and public health decision making. Agar plate assays can be used to screen for azole-resistant Aspergillus fumigatus isolates cultured from patients. CDC has provided the following process that institutions can adapt to successfully screen for azole-resistant isolates. Once screened, all isolates should be submitted to CDC for surveillance purposes.

About
One way to screen isolates of Aspergillus fumigatus for azole resistance is to use an agar plate assay that includes antifungal drugs in the agar. Growth on the agar with antifungals would indicate resistance.
This assay is based on the recommended European Committee on Antimicrobial Susceptibility Testing (EUCAST) assay. Any isolates identified by this assay should be confirmed using a traditional antifungal susceptibility test, such as broth microdilution or gradient strip diffusion.
The Centers for Disease Control and Prevention is interested in receiving azole-resistant Aspergillus fumigatus isolates collected in the United States for surveillance. You can contact the Mycotic Diseases Branch about resistant isolates by emailing aspergillus@cdc.gov.
1.0 Purpose
The environmental mold Aspergillus fumigatus causes invasive aspergillosis. In patients with high-risk conditions, mortality often exceeds 50%. Azole antifungals can improve survival, but azole-resistant Aspergillus fumigatus infections are increasingly reported worldwide. These infections are associated with increased treatment failure and mortality.
This procedure will screen Aspergillus fumigatus isolates for azole antifungal resistance using a 4-quadrant agar plate with antifungals. Azole resistance must be confirmed through testing using broth microdilution.
2.0 Scope
Although this media can be used for the screening of any Aspergillus species for resistance to azoles, this procedure is written primarily for use with Aspergillus fumigatus.
This procedure walks through:
- Creating 4-well screening plates
- Processing isolates
- Inoculating Aspergillus screening plates and recording results
- Storing isolates
4.0 Equipment
Ensure equipment is properly maintained and calibrated per your institution's protocols. You will need the following:
- Stir plate and sterile stir bars
- Water bath set to 50-55⁰C
- Sterile capped glass tubes
- Vortex mixer
SWUBE Applicator or cotton swab: example VWR (Catalog# 90001-126) or equivalent 4-well plate or petri dish (see images below). 0.5 Mcfarland Standard should be used as reference.
5.0 Reagents, supplies, and media
- Sabouraud Dextrose agar (Emmons). Can be Fisher Scientific (Product# L21827) or an equivalent molecular grade sterile water.
- Tween-20: example: Fisher Scientific (Product# BP337-100) or equivalent
- Voriconazole example Sigma (catalog #PZ0005)
- Itraconazole example Sigma (catalog #I6675)
- Posaconazole example Sigma (catalog #SML2287)
- Lysol Disinfectant concentrate (Fisher Scientific Cat # NC974686) or equivalent
5.1 RPMI Media
The Aspergillus screening plates contain four quadrants with RPMI 1640 2% glucose agar:
- One growth control well with no antifungal powder
- One voriconazole well
- One itraconazole well
- One posaconazole well
RPMI 1640 powder 10.4g/L (Sigma Aldrich #R1383) or equivalent MOPS buffer powder (Sigma Aldrich #M1254 or equivalent) 34.5 g/L NaOH 1mol/L Bacto agar 15g/L (for solid media) D-Glucose 20g/L
- Dissolve RPMI, MOPS, and glucose into 450 mL distilled H2O, adjust to pH 7.0 with NaOH.
- Filter sterilize with a 0.2 micron filter (Never autoclave MOPS) and gently warm to 50⁰C in a hot water bath.
- Add 15g agar to 400mL molecular grade H2O and autoclave for 20 minutes. A stir bar should be added prior to autoclaving.
- Put the autoclaved agar solution in the 50⁰C hot water bath and let cool down to 50⁰C.
- Add autoclaved agar solution to sterilized RPMI solution. Adjust final volume to 1L with sterile distilled H2O on stir plate.
If using only a single batch of media, the media can be divided into 250 mL aliquots and the drug powder that will be used for screening the isolates can be added. The aliquots should be made into sterile flasks with sterile stir bars so that they can be stirred when the drug powders are added. Note the final concentrations for each reagent:
- Voriconazole: 2mg/L final concentration
- Itraconazole: 4mg/L final concentration
- Posaconazole 0.5mg/L final concentration
- Add powdered drug while media is at 50⁰C.
- Dissolve powder into media using a stir plate and sterile stir bar. If the agar starts to cool, place back in the 50⁰C water bath.
- Each plate will have a control well, a voriconazole well, an itraconazole well and a posaconazole well. If the quadrants/wells are not labelled, label them for orientation purposes. Use the same pattern and order for all plates to make interpretation easier.
The amount of media aliquoted in each well will depend on the plate that is used. Follow manufacturer's instructions for the amount of media to be added to each well.
Store quadrant plates with antifungal containing medium at 4⁰C. Plates should be used within 12 weeks (or until the QC fails).
6.0 Supplies and other materials
SWUBE Applicator or cotton swab: example VWR (Catalog# 90001-126) or equivalent 4-well plate or petri dish – some examples are below
0.5 McFarland Standard
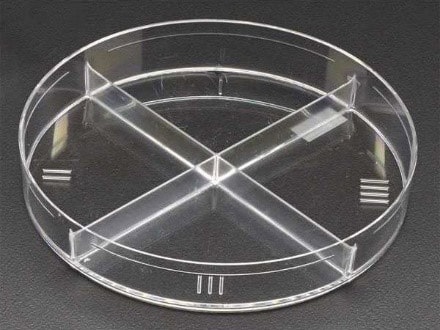
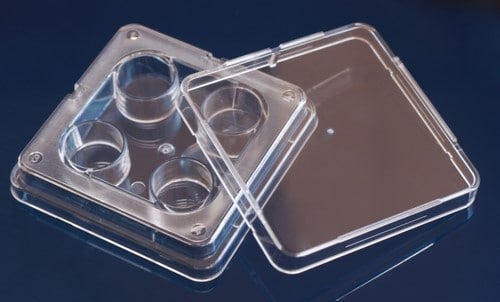
7.0 Safety precautions
Note: All institutional safety procedures must be followed when performing this standard operating procedure.
7.1 Standard personal protective equipment should follow institutional guidelines but should consist of at least gowns, gloves, and safety glasses, which should be worn at all times.
7.2 Aspergillus isolates should be handled in a certified biological safety cabinet under BSL-2 conditions.
7.3 Surfaces and supplies should be decontaminated using 1:128 Lysol solution or other decontaminant for molds approved by your institution.
8.0 Quality control isolates
The QC isolates should be grown on Sabouraud Dextrose agar (Emmons) slants and should be passaged fresh every time the test is run. Water cultures can be used for long term storage as described below. Prepare a number of stock solutions for each control to avoid repeatedly going into the same tube and risking stock contamination.
8.1 Control Strains (can be order from CDC/FDA AR Bank):
- Aspergillus fumigatus azole-resistant isolate
- Aspergillus fumigatus azole-susceptible isolate
9.0 Sample processing
This protocol assumes that isolates to be screened have already been identified as Aspergillus fumigatus. This can be accomplished visually (although that will only identify down to Aspergillus fumigatus species complex), by DNA sequencing of the beta tubulin gene, or by MALDI-TOF with Aspergillus fumigatus in the database.
9.1 Assign an identification number, consistent with your laboratory numbering system, to each isolate.
9.2 Subculture isolates by transferring onto a Sabouraud dextrose agar slant using a sterile loop and incubate at 35°C. The cap for the slant should be screwed on enough to contain spores but not so much that air is unable to enter the slant.
9.3 Quality control isolates (both azole-resistant and azole-susceptible) should be subcultured alongside each group of tested isolates.
9.4 After 3-7 days of growth, the isolates that are producing conidia will be ready for the next steps; the slant will be used for both setting up a water stock and for susceptibility testing.
- 9.4.1 A mold which displays visible dark green/blue spores is ready for use.
- 9.4.2 A mold that remains white and has not turned green may not be producing conidia. Make a tease prep to see if conidia are present.
- 9.4.3 If the mold is any other color but green, it may not be fumigatus and will not be included in the study.
- 9.4.4 If no conidia are present, re-inoculate the culture on a fresh slant. If it still does not turn green either process with the few conidia that are present or send to a reference laboratory for further workup. Often, patient isolates of Aspergillus that do not sporulate have been subjected to long-term antifungal treatment and are azole resistant.
10.0 Preparing Isolate for testing and storage
The steps outlined below will be used for both creating the water stock and creating the inoculum. The same slant can be used for both steps.
10.1 Make a stock solution of diluent by adding 1 mL of Tween-20 to 50 mL of molecular grade water.
10.2 Working in the BSC, add 2 mL of the water/Tween-20 solution to a 3-7 day old slant. The Tween-20 will help to get the Aspergillus conidia into suspension; otherwise, they may just float on the surface.
10.3 Add the liquid slowly and gently, taking care not to disrupt the spores and allow them to disperse into the air.
10.4 Replace the cap, screw tightly, and gently shake the tube, allowing the water and Tween solution to dislodge the spores from the slant. The resulting liquid in the tube should become cloudy and dark with spores.
10.5 If the liquid in the tube does not become cloudy, using a sterile plastic inoculating loop, gently rub the surface of the hyphal mat to dislodge the conidia into the water. Be careful that the hyphae are not torn off of the mat. Only gentle pressure should be applied.
10.6 Using a transfer pipette, transfer 1 mL of the conidial suspension into a screwcap Cryovial tube. Label the tube and store the tube at room temperature. The conidia in this tube (water stock) will remain viable for at least 5 years. Some have been recovered 10 years later.
11.0 Preparing and performing susceptibility testing
11.1: Remove the Aspergillus screening plates from refrigerator. Allow them to reach room temperature.
11.2: Aliquot 2 mL of sterile molecular grade water into a 13 x 100 mm sterile capped Pyrex test tube.
11.3: Use the residual water in the slant from steps 10.1-10.4 to perform the next step.
11.4: Using a transfer pipet, drop 1-2 drops of the conidia suspension into the 2 mL water and vortex.
11.5: Visually compare the suspension to the 0.5 McFarland Standard. Make adjustments as described in 11.6 until the suspension visually matches the standard.
11.6: Adjust by adding more water if the suspension is too turbid. Add more conidial suspension if the turbidity is too low. This will yield a stock suspension of approximately 1-5 x 10⁶ cells per ml.
11.7: The suspension is now ready for inoculation of an Aspergillus screening plate. (See figure below.)
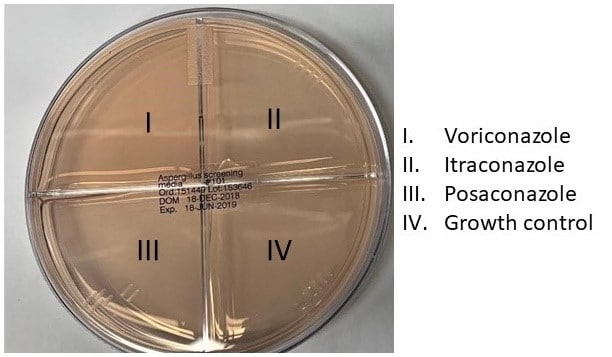
11.8: Dip a sterile cotton swab in the dilute conidia suspension and streak the entire surface of a quadrant using a back-and-forth motion. Re-dip the swab and streak each of the remaining three quadrants. The drug-free quadrant should be streaked first but after that the order does not matter.
11.9: Incubate the plate at 35-37°C for 48 hours.
12.0 Interpreting Results
12.1: The growth control well must produce growth (see example below) in order to validate the rest of the results. Each well is marked as either growth or no growth on documentation paperwork. Any amount of growth in the drug wells or quadrants counts as growth for the purposes of this assay.
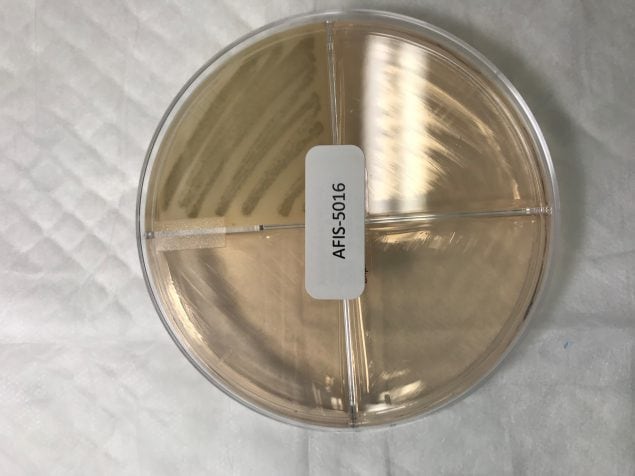
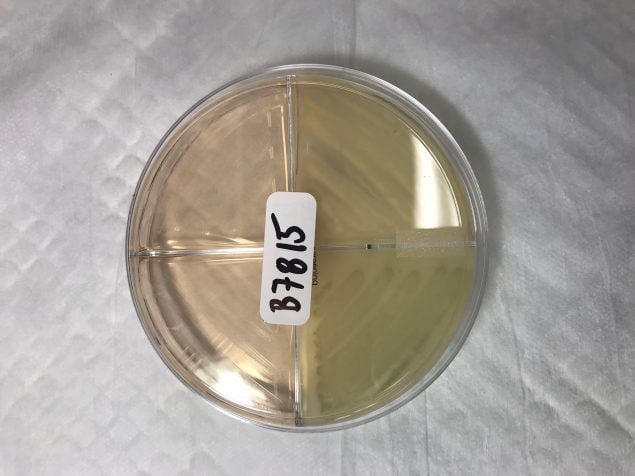
12.2: In the example above, following the picture in 11.7, the plate in the first image would be marked as azole susceptible. The plate in the second image would be marked as presumptive resistant to itraconazole.
13.0 Next steps
13.1 Isolates which are able to grow in the presence of any azole drug must be confirmed resistant by broth microdilution. This should follow CLSI guidelines in their respective documents[1, 2].
Submitting isolates
The Centers for Disease Control and Prevention is interested in receiving azole-resistant Aspergillus fumigatus isolates collected from the United States for surveillance. You can contact the Mycotic Diseases Branch about resistant isolates by emailing aspergillus@cdc.gov.
The European Committee on Antimicrobial Susceptibility Testing (EUCAST) also has a published standard for performing azole resistance screening[A]1.
- Guinea J, Verweij PE, Meletiadis J, Mouton JW, Barchiesi F, Arendrup MC; Subcommittee on Antifungal Susceptibility Testing (AFST) of the ESCMID European Committee for Antimicrobial Susceptibility Testing (EUCAST). How to: EUCAST recommendations on the screening procedure E.Def 10.1 for the detection of azole resistance in Aspergillus fumigatus isolates using four-well azole-containing agar plates. Clin Microbiol Infect. 2019 Jun;25(6):681-687.
- Clinical and Laboratory Standards Institute. 2017. M38 – Reference method for broth dilution antifungal susceptibility testing of filamentous fungi, 3rd edition. Clinical and Laboratory Standards Institute, Wayne, PA.
- Clinical and Laboratory Standards Institute. 2017. M61 – Performance standards for antifungal susceptibility testing of filamentous fungi, 1st edition. Clinical and Laboratory Standards Institute, Wayne, PA.
- Disclaimer: The Mycotic Diseases Branch laboratory developed the document with this standard as an example test procedure for screening to identify triazole-resistant Aspergillus fumigatus using agar plates. It is the responsibility of the testing laboratory to ensure content and format are modified as necessary to meet applicable regulatory requirements, quality standards, and safety requirements. This is not a controlled document and the described test methods are subject to change without notice. It is the responsibility of the testing laboratory to ensure the information within this document remains applicable. Contact the test developer at gyi2@cdc.gov to find out whether any changes have been made. Use of trade names and commercial sources are for identification only and do not constitute endorsement by the Public Health Service, the United States Department of Health and Human Services, or the Centers for Disease Control and Prevention.
