Clinic Administrator Third-Party Clinic User Manual
Your Role and Activities in VAMS
As a Clinic Administrator at a third-party clinic, you will use VAMS to:
- Define and manage your clinic’s information (e.g., shipping address),
- Add clinic staff as VAMS users,
- Manage your clinic’s vaccine inventory, and
- Add vaccine recipients in VAMS
You have unique activities that only you, as the clinic administrator, can perform in VAMS and some that you share with other users. The VAMS Role and Activity Matrix below shows the tasks available in VAMS for specific roles.
| Activity in VAMS | Clinic Administrator (CA) | Healthcare Professional (HP) | Inventory Manager (optional) | |
|---|---|---|---|---|
| Serve as the clinic POC for your jurisdiction. (Typically, the clinic administrator serves as the clinic POC.) | ||||
| Manage clinic information (e.g., shipping address). | ||||
| Manage (add, edit, and remove) VAMS clinic users. | ||||
| Place vaccine inventory requests. | ||||
| Log vaccine inventory when received. | ||||
| Reduce vaccine inventory. | ||||
| Monitor clinic vaccine inventory levels. | ||||
| Add and edit vaccine recipients and their information in VAMS. | ||||
| Document in vaccine recipient records that Prevaccination Actions have been completed. | ||||
| Administer and log vaccination (vaccine information, outcome, and waste if applicable). | ||||
| Search for, edit, and invalidate recipient vaccination records. | ||||
| Track recipients’ next-dose eligibility (if applicable). | ||||
| Clinic Data Reports Access: | ||||
| View and export Vaccination Administration Report; requires user to have both clinic administrator (CA) and healthcare professional (HP) roles in VAMS. | ||||
| View and export Inventory-Vaccine Level Report. | ||||
Other role-specific user manuals are available within “Resources for Jurisdictions, Clinics and Organizations”. If you have questions about specific tasks in VAMS that are relevant to your role or other roles at your clinic, quick reference guides are also available on this page.
Clinic Types in VAMS
In VAMS, clinics are assigned to a Clinic Type (e.g., Standard, Mobile, Third-Party, etc.).
Clinics are then further assigned to one of seven Clinic Service types. These Clinic Services include:
- Vaccinations
- COVID-19 Testing
- Scheduling
- School-Located Vaccinations
- Field-Located Vaccinations
- Vaccines for Children
- Other
NOTE: If the Clinic is set up as a Third-Party Clinic, the only Clinic Services available for selection will be Vaccinations, COVID-19 Testing, and Scheduling.
To learn more about the different Clinic Types and Clinic Services within VAMS, visit the Quick Reference Guide for Clinic Types.
Roles Needed for Third-Party Clinic Operations
To maintain clinic operations, your clinic must have:
- A clinic administrator
- A healthcare professional
If you are your clinic’s point of contact (POC) for your jurisdiction, you will register your clinic in VAMS after activating your user account. Additionally, since the clinic administrator can manage inventory in VAMS, your clinic is not required to fill the inventory manager role, but we recommend it.
What Third-Party Clinic Staff Can Do in VAMS
Third-party clinics in VAMS are denoted as clinics responsible for both adding and managing recipient records as well as administering and tracking recipient vaccination in VAMS.
In VAMS, third-party clinics:
- Are not publicly searchable and only administer vaccine to select recipients added by the clinic.
- Do not allow for scheduling of appointments as recipients do not self-register or self-schedule appointments in VAMS. However, third-party clinic administrators may choose to mark their clinic as “available for scheduling,” which allows vaccine recipients with VAMS accounts to
- find your clinic in search results for walk-in clinics only and
- schedule walk-in appointments at the clinic.
Outside of VAMS, third-party clinic staff must establish local processes for activities such as:
- Managing the schedule for the clinic and recipient vaccinations
- Confirming pre-vaccination actions are complete
- Notifying recipients they are eligible for vaccination at the clinic
- Notifying recipients of a multi-dose vaccine when they are eligible to receive their next dose of vaccine (if recipients do not elect to receive communications from VAMS)
Third-Party Clinic User Roles:
- Required third-party clinic user roles include: clinic administrator and healthcare professional.
- Recommended third-party clinic user role: Since the clinic administrator can manage inventory in VAMS, third-party clinics are not required to fill the inventory manager role with a separate user, but it is recommended.
- Third-party clinic user roles do not include a front desk role because recipients will not be checked in at the clinic through VAMS.
Third-Party Clinics: Frequently Asked Questions
This list summarizes the three steps you will take to set up your clinic in VAMS. Once completed, your clinic will be active in the system, which means:
- You or your inventory manager will be able to place vaccine inventory requests
- You or your healthcare professionals will be able to add recipients in VAMS
- Your healthcare professionals will be able to log vaccine administration
Click on the buttons below to go to the corresponding sections in this user manual.
Follow the prompts in your registration email from vams@cdc.gov to complete this step.
Clinic POC only: Your registration link will prompt you to register your clinic in VAMS immediately after activating your user account.
This sends your clinic staff a registration email to activate their own VAMS account.
Step 1: Activate Your User Account
You must activate an account in VAMS to use the system. After your jurisdiction POC enters your name and email address in VAMS, you will receive an email with a VAMS registration link.
Visit “Getting Started in VAMS” for directions on how to create an account in VAMS. If you need additional support for your role or have questions about creating an account, registering for VAMS, or accessing VAMS, this page has answers to common questions.
If you are your clinic’s POC, upon logging into VAMS, you will be taken to the Register Vaccination Clinic page where you will follow the instructions in Step 2: Register Your Clinic in VAMS. If you are not the clinic POC, you will be taken to your clinic’s home page in VAMS.
Step 2: Register Your Clinic in VAMS
NOTE: This only applies if you are filling both the clinic POC and the clinic administrator role. If you are not your clinic’s POC, you can skip this step.
What you’ll need to complete this step:
- Clinic name
- Clinic services
- Clinic type
- Primary address
- Shipping address
- Phone number
- Clinic Facility ID (required for reporting to CDC)
- Provider PIN (required to identify your clinic for ordering in VTrckS)
- Parent Organization ID (if required by your jurisdiction for HL7 integration)
Quick Tip: Most of this information may have already been added in VAMS by your jurisdiction POC, so you will simply be confirming it is all correct and making any necessary edits.
Steps to Register Your Clinic in VAMS
- On the Clinic Point of Contact page, confirm your information is correct.If not, make the necessary edits, then click Next.
Note the fields marked with a red asterisk (*) are required. - On the Clinic Information page, confirm your clinic’s information is correct. If not, make the necessary edits, then click Next.
- NOTES about clinic information:
- If the incorrect clinic type was selected, you may edit it by clicking the drop-down arrow in that field. You cannot edit your clinic type after completing registration.Be sure to confirm your selection is accurate before continuing with registration.
- Your clinic’s Facility ID and Provider PIN are required to ensure your data is reported accurately. If either of those fields are blank, contact your jurisdiction POC.
- The Parent Organization ID may also be required by your jurisdiction.
- Confirm the time zoneis correct for your clinic’s physical location or make any necessary changes. You cannot edit your clinic’s time zone after completing registration.
- Primary and Shipping Addresses:
- Your clinic’s shipping address can be different from the physical address if you prefer vaccine to be shipped to another location. Both your clinic’s primary and shipping addresses can be edited at any time.
- Review all information. If it is correct, check the Box at the bottom left of the screen, then click Next. If you want to make edits, click Previous.
CONGRATULATIONS!
Your clinic is now active in VAMS!
- Click the View Portal button, then click the Clinic Setup tab to begin Step 3: Add Clinic Staff as VAMS Users.
NOTE: After registering your clinic in VAMS, it shows as “active” to your jurisdiction POC in the system. However, it is not visible to recipients.
If you want to make your clinic available for scheduling walk-in appointments, follow the steps below.
- Navigate to the Clinic Setup tab. Click Finish Setup in the Clinic Details window.
- Click Edit on the clinic details page.
- Select an Appointment Duration from the drop-down menu.
- Scroll to the bottom of the page and check the Available for Scheduling checkbox. Checking this box allows recipients using guest registration to pre-register for a walk-in appointment at your clinic.
- NOTE: Once a recipient completes the guest registration flow and pre-registers for a walk-in appointment, they will appear on the Other Recipients tab where a Healthcare Professional can locate their name to log their vaccination.
- Enter a Start and End Date, Clinic Phone Number, and Clinic Email Address.
- If you want to allow recipients to schedule appointments for all doses before completing their current dose, also check the box under Scheduling Multiple Doses.
- Once finished, click Save at the top of the page.
Step 3: Add Clinic Staff as VAMS Users
What you’ll need to complete this step:
- Familiarity with each clinic staff role in the VAMS Role and Activity Matrix, which includes the clinic administrator, healthcare professional, and inventory manager (optional).
- Email address for each user you plan to add.
Adding clinic staff as VAMS users will give them access to perform their role in the system. The three VAMS third-party clinic user roles should generally align with each user’s existing scope of responsibility at the clinic (e.g., the healthcare professional user role has access in VAMS to perform the activities of a healthcare professional, such as accessing a recipient record and logging vaccination).
However, as the clinic administrator, you can assign multiple user roles to one user, giving them access to perform additional tasks in VAMS.
- For example, a healthcare professional at your clinic should be assigned a healthcare professional role in VAMS. You can also assign the inventory manager role to that healthcare professional user, so they have access in VAMS to place, track, log, or reduce vaccine inventory.
- The Healthcare Professional role must be assigned only to Healthcare Professionals and other authorized staff because they have access to view recipient personally identifiable information (PII) and protected health information (PHI). Assigning a Healthcare Professional role in VAMS to a non-Healthcare Professional or authorized staff is strictly prohibited.
NOTE: Prior to assigning multiple roles to clinic staff, it is important to be familiar with the VAMS Role and Activity Matrix as it provides a detailed description of the access each user has based on their role(s) in VAMS.
Add VAMS User Roles to Clinic Staff
- To add clinic staff as VAMS users, click the Clinic Setup tab on your Clinic Portal home page, then click the Drop-Down Arrow in the Manage Users window.
- Click the Add User button.
- In the Add or Update User pop-up window, enter the user’s Email Address, and click Search.
NOTE: This feature searches to see if the user’s email address has already been activated in VAMS. For detailed information about adding clinic staff members who are already VAMS users for other clinics, see Access Multiple Clinics in VAMS in the Additional VAMS Functionality section.
- In the next pop-up window, enter the user’s information and select the role(s) you want them to perform in VAMS.
- NOTE: Prior to adding additional roles to a user’s record in VAMS, refer to the VAMS Role and Activity Matrix for clarity on each role’s access in the system.
- Click Save.
- After you click Save, a registration email will automatically be sent to the user with a registration link to set up their account in VAMS.
Quick Tip: After adding clinic staff, you can edit their information, including name and email address, by navigating to the Manage Users window, clicking on the Name of the user you want to edit, then clicking Edit in the top right corner of the page.
CONGRATULATIONS!
You have completed all three steps necessary to set up your clinic in VAMS. The next three sections provide guidance on how to perform additional tasks in VAMS, including how to manage inventory, which must be added before your clinic can administer vaccine.
This section will show you how to add and manage recipients in VAMS.
Click on the buttons below to go to the corresponding sections in this user manual.
Add Recipients
Manually add recipients in VAMS one at a time.
Fill in the most recent version of the Recipient Import Template to bulk upload multiple recipients in VAMS.
Use the Other Recipients tab to search for recipients who have already been added to another VAMS clinic. If desired, add them to your clinic to receive vaccination.
Manage Recipients
Both the clinic administrator and the healthcare professional at a third-party clinic can document the completion of Prevaccination Actions.
Both the clinic administrator and the healthcare professional at a third-party clinic can track next-dose eligibility.
Export recipient data from your clinic and download the file to your device.
Remove recipient records from your clinic.
Add Recipients in VAMS
Since vaccine recipients will not be creating their own account and entering their information in VAMS, they will need to be added in VAMS by a Clinic Administrator or Healthcare Professional.
You will need the following information about the recipient to add them in VAMS:
- First and Last Name
- Sex
- Date of Birth
- Ethnicity
- Race
- Home Address
- Representative/Guardian information. You can use this field to designate if you want to associate the recipient you are adding with a representative(s), guardian(s), or existing VAMS account(s). If Yes, you must enter the representative/guardian’s First Name, Last Name, and Date of Birth. You may also select the representative/guardian’s Relationship to the Recipient and include the representative/guardian’s Email or Phone Number. NOTE: If you do not add a representative/guardian when first adding a recipient, you cannot add them later.
- You can add up to two representatives/guardians for each recipient. Adding a recipient as a dependent to a representative, guardian, or existing VAMS account will enable the representative/guardian to access the recipient’s details, schedule appointments on behalf of the recipient (at standard and mobile clinics) and view the recipient’s vaccination certificate(s) (if the representative/guardian has a registered VAMS account).
- NOTE: If a recipient has already been added in VAMS, you can only associate a second representative/guardian to their account if you already associated a first representative/guardian when adding the recipient to your clinic.
- Contact Information (optional). The recipient’s home address will auto-populate to the third-party clinic’s address, but you can change this under Contact Information. Here you can also add a recipient’s email address, home phone number, and/or cell phone number.
- Communication Preferences. If you enter an email address or cell phone number for the recipient, you must select a preferred contact method and a preferred language for messages (English or Spanish). If SMS is selected as the preferred contact method, VAMS will send the recipient a verification code via SMS. You must enter this code to continue adding the recipient. Third-party recipients who provide an email address or phone number and elect to receive communications from VAMS will receive follow-up communications from VAMS via their preferred contact method (e.g., communications about reporting adverse events and reminders for next-dose eligibility).
- Account Information (optional). You can use this section to enable a recipient to register their own VAMS account by having VAMS send a registration link to the recipient’s preferred method of contact. You can activate this registration message by selecting Yes under Create a VAMS account for recipient? This enables the recipient to access the Recipient Portal where they can edit their information and schedule vaccination appointments at standard and mobile clinics. You can only use this field to register a recipient’s account if they have provided an email address or cell phone number for their VAMS account.
- NOTE: You also have the option to add an External System ID for the recipient. The External System ID field may be useful if your clinic uses an external appointment scheduling process or has an external recipient database. This ID must be unique and can be used to search for recipients once added to your clinic.
- Once a recipient is added, you will be able to see if they have a VAMS account on the Recipient Information page. If they did not create a VAMS account when initially added to your clinic, you can go to the Recipient Information page to edit their details to create a VAMS account in the future.
- Pre-vaccination Actions. Pre-vaccination actions that must be completed include screening the recipient for contraindications, providing the Emergency Use Authorization (EUA) Fact Sheets or a Vaccine Information Statement (VIS) depending on the vaccine product(s) available to the recipient, and acquiring authorization, if required. If the pre-vaccination actions have not been completed, you or the healthcare professional can edit this response at any time after the recipient has been added in VAMS.
- Insurance Information (optional)
- Emergency Contact Information (optional)
Additional information about adding recipients in VAMS
- An auto-generated number called a VAMS ID will be created for each recipient added in VAMS. These system-generated IDs are not editable and are assigned to all existing and future recipients upon record creation. VAMS IDs are searchable on the Manage Recipients and Other Recipients tabs and will appear on recipients’ vaccination certificates.
- The system will perform two duplication checks when recipients are added to a third-party clinic, regardless whether they are added individually or via bulk upload. The duplication checks will review first name and last name, date of birth (DOB), ZIP code, and External System ID (if provided) and will not allow recipients who fail the duplication check (e.g., have the same External System ID or the same first name, last name, DOB, and ZIP code) to be added.
- In addition, if you attempt to create a VAMS account for a user with a preferred method of contact (email address or cell phone number) that is already associated with an existing VAMS account, VAMS will display an error message. Depending on the registration status of the existing VAMS account, VAMS will prompt you to either link the new account to the existing account or to change the new user’s preferred method of contact.
- After adding recipients, you can edit their information, including demographics, contact information, insurance information, External System ID, and whether their Prevaccination Actions have been completed, by navigating to the Recipient Management tab or Other Recipients tab. Once you’ve located the recipient you want to edit, click on their Name, then click Edit Information under the Recipient Details tab.
-
- NOTE: This does not include editing recipient vaccination records, such as date of vaccination, vaccine manufacturer, lot number, etc.
- Prior to adding a recipient in VAMS, you can search on the Other Recipients tab to see if they have already been added by another VAMS clinic. If desired, you can then add them to your clinic to receive vaccination. More information about the search functionality on the Other Recipients tab can be found later in this user manual.
- After adding a recipient in VAMS, you can review the recipient’s account registration status in their recipient record. To review this information, navigate to the recipient’s record, then scroll to the bottom of the Recipient Details tab to the Account Information window. If there is a username listed in the Account Information window, that means the recipient has been sent a registration email to register their account.
Managing Recipients in VAMS: Frequently Asked Questions
Add Recipients One at a Time or via Bulk Upload
On the Recipient Management tab, there are two ways to add recipients in VAMS: one at a time or via bulk upload.
Add Recipients One at a Time
- Click the Add Recipient on the Recipient Management tab, which is also your third-party clinic’s home page in VAMS.
- Enter the recipient’s information, listed above. Note that fields marked with a red asterisk (*) are required. Click Next.
- Review all information entered on the Add Recipient page and verify everything is correct. If so, check the Box at the bottom of the screen confirming the information is accurate, then click Submit. If not, click Previous to make corrections before proceeding.
- After clicking Submit, the recipient’s record is saved in VAMS.
Add Recipients via Bulk Upload
Bulk uploading allows you to add multiple recipients at once by adding their information in a comma delimited (.csv) template and uploading it in VAMS.
NOTE: When bulk uploading recipients, VAMS will cross-check them against existing recipients who have been entered in VAMS.
If a recipient does not exist in VAMS, the system will create a new record for that person on the Recipient Management tab. If a recipient was previously removed from your third-party clinic or if a recipient already exists in VAMS, they will not be added to your clinic via bulk upload. To add existing recipients to your clinic, use the search feature on the Other Recipients tab in VAMS to search for recipients then add them to your clinic.
- Click Import Recipients on the Recipient Management tab.
- Click the Recipient Import Template link in the pop-up window that appears. After clicking the link, the template file will download to your computer.
- Open the file and enter the recipients’ information.
- Save the file as a CSV UTF-8 (Comma delimited) (.csv) You can find this option under the Save As drop- down menu in Excel.
- Click Upload Files in the Import Recipients pop-up window. You can also drag and drop the file in the Drop Files area of the pop-up window.
- Click Close.
Important Notes About the Recipient Import Template File:
- The file opens on your computer as an .xlsx file, but you must save it as a CSV UTF-8 (comma delimited) (.csv) file after entering all information and before uploading it to VAMS. No other types of CSV files are accepted in VAMS.
- You must use the most recent version of this template when uploading a list of recipients in VAMS. Please ensure you download the latest version of the import template each time you attempt to bulk upload recipients in VAMS to take advantage of constant improvements and to avoid data issues/inconsistencies.
- All fields within the template marked with an asterisk are required. VAMS will not upload a recipient if any of the required fields are left blank.
- Similar to adding a recipient individually, attempting to upload a recipient using the same preferred method of contact as an existing recipient in VAMS will result in failure with an error message explaining the reason why.
- Fields that contain a pick list or drop-down options must contain a selection.
- The recipient’s DOB must be in MM/DD/YYYY format.
- VAMS will not upload duplicates if someone is listed in the CSV file multiple times or if they have already been added in VAMS. The system identifies duplicates using a combination of the recipient’s first name, last name, DOB, ZIP code, and External System ID (if provided). For a recipient to be unique (and get uploaded to VAMS) their first name, last name, DOB, and ZIP code cannot all match an existing recipient, and their External System ID (if provided) must not match an existing recipient.
- There is a file size limit of 25 MB.
- You are limited to uploading a maximum of 9,999 recipients at one time. If the file contains 10,000 or more recipients, the following error message will appear: “The file uploaded has more than 9,999 records which exceeds the limit of the Import Functionality. Please try again.”
- After inputting recipient information and saving the Recipient Import Template as a CSV UTF-8 file, you should close the file and immediately upload it into VAMS. Do not reopen the file on your computer between conversion and upload. In some cases, reopening the file after saving as a CSV UTF8 file could alter field properties and cause the recipient upload to fail.
Quick Tip: A comma-separated values (CSV) file is a delimited text file that uses a comma to separate values. A CSV file stores tabular data (numbers and text) in plain text.
Confirm Bulk Upload
After importing a list of recipients, the following processes automatically occur in VAMS:
- A message will appear on screen that your list is in the import queue.
- After your list has processed, you will receive an email from vams@cdc.gov, stating it is uploaded.
- A result log will appear on the Data Imports tab.
- Click the Data Imports tab to check the results of your bulk upload. Ensure your Data Imports tab is showing the Recipient Import list in the dropdown field at the top of the page.
- In the Recipient Import list, you will see information about your upload, including the system-generated Import ID number, who imported the list, and when it was imported.
- Click the Import ID number of the recipient import to open the Import Details page.
There are two main sections on the Import Details page:
- Import Details, which include the Import ID, who created it, and the date created.
- Files table, which includes two files: a Result Log for Bulk Upload file and the Recipient Import file you uploaded.
- The Result Log for Bulk Upload file shows the results of your file upload.
- Click the Result Log for Bulk Upload link to open the file.
- Scroll to the right until you see the Status column. The Status column shows whether a recipient was added in the system.
- All recipients who have a status of Success have been uploaded in the system.
- Recipients whose statuses include an error message were not uploaded in the system and the message will tell you why.
NOTE: When bulk uploading recipients, VAMS will cross-check them against existing recipients who have been entered in VAMS.
- If a recipient does not exist in VAMS, the system will create a new record for that person on the Recipient Management tab.
- If a recipient was previously removed from your third-party clinic or if a recipient already exists in VAMS, they will not be added to your Recipient Management tab via bulk upload, but will be added to the Other Recipients tab. See the Other Recipients section for more information about the Other Recipients tab in VAMS.
Quick Tip: Once recipients have been added in VAMS, you can edit their information, including if their Prevaccination Actions have been completed from the Recipient Management tab (or Other Recipients tab if the recipient already existed in VAMS). Click the Name of the recipient whose record you want to edit, then click Edit Information below the Recipient Details tab within the recipient’s record.
Remove Recipients
You can remove recipients on the Recipient Management tab by clicking the Drop-Down Arrow on the right side of their row in the Vaccine Recipients table and clicking Remove. After clicking Remove, you must confirm you wish to remove them before VAMS will remove the recipient from your clinic.
Other Recipients
Search for Recipients Already in VAMS
Prior to adding a recipient in VAMS, you can use the search feature on the Other Recipients tab to see if they have already been added in the system. The search feature will search for all recipients in VAMS, including those who have registered their own accounts at standard and mobile clinics as well as those who were added by other third-party clinics. It will also search for recipients who were previously removed from your clinic. Once you find a recipient in the system, you can then add them to your clinic to receive vaccination.
- Click the Other Recipients tab.
- Click Find a Recipient in the top right corner of the screen.
- Search for the recipient’s record by entering their Email Address, Cell Phone Number, VAMS ID, or External System ID, or by entering their First and Last Name and Date of Birth. Note that if you enter first name, last name, and date of birth, all three fields are required, as indicated by a red asterisk.
- Click Search.
- The results of your search will appear at the bottom of the page.
- Once you find your desired recipient, click the Checkbox to the left of their name, then click Add Recipient in the top right corner of the Search Results table.
- After adding the recipient, you will see a green alert at the top of the screen confirming you successfully added the recipient to your clinic.
- If you cannot find the recipient you’re looking for and still want to add the recipient to your clinic, click Back to Portal. After returning to the Recipient Management tab, click Add Recipient to add the recipient as a new recipient in VAMS.
NOTES:
- Recipients added to your clinic by using the search feature on the Other Recipients tab will remain on that tab and will not appear on the Recipient Management tab. The Recipient Management tab will contain recipients newly added in VAMS by your clinic staff.
- You cannot add recipients to your clinic who already have an appointment scheduled at another clinic.
- You can edit recipient details added via the Other Recipients tab as you normally would. Navigate to the Other Recipients tab, click the recipient’s hyperlinked name, then click Edit Information under the Recipient Details tab.
Accessing a Recipient’s Vaccination Records: Frequently Asked Questions
Document Completion of Pre-vaccination Actions
Both the clinic administrator and the healthcare professional at a third-party clinic can document the completion of Pre-vaccination Actions. Pre-vaccination Actions will vary by clinic but can include things such as screening the recipient for contraindications, providing the Emergency Use Authorization (EUA) Fact Sheets for Recipients and Caregivers, and acquiring authorization, if required.
You will need:
- Recipient’s name
- Search for a recipient’s record in the Vaccine Recipients table on the Recipient Management tab.
- You can search by name using the search bar in the table header. Note that you can search for full names or just the beginning of the recipient’s name. For example, you can find the record for a recipient named William Smith by searching for “Will.”
- Click a Recipient’s Name in the Vaccine Recipients table to access their recipient record.
- After accessing the recipient record, you will see an alert that indicates whether a recipient’s pre-vaccination actions are complete.
- To update this response to indicate their pre-vaccination actions are complete, click Edit Information in the Recipient Details tab.
- Select a Response from the drop-down menu under “Have the pre-vaccination actions been completed?” Then click Save.
NOTE: On the Recipient Management tab, you can filter your list view of recipients by All Vaccine Recipients (default view), New Vaccine Recipients (those who have received zero doses), Today’s Eligible Recipients, Tomorrow’s Eligible Recipients, and Vaccine Protocol Completed (those who have completed their vaccination schedule). These list views include standard recipient details such as name, date of birth, gender, contact information (if provided), whether Pre-vaccination Actions are completed, vaccine status, follow-up vaccination date (if necessary), and External System ID.
Export Recipients
If desired, you can use VAMS to export recipient data from your third-party clinic. You can use Export Recipient Data on the Recipient Management tab to export recipient data within a certain date and time range. Note that VAMS only exports recipients added to your third-party clinic during your specified date and time range. For example, if you added a recipient to your clinic on March 1, and you export recipient data from March 5 to March 15, the recipient you added on March 1 will not appear in your export file.
- From the Recipient Management tab, click Export Recipient Data on the left side of the screen.
- Select the Start Date and Time and End Date and Time for the recipients you want to export.
- Click Export.
- The export file will download to your device and can be opened as an Excel document.
- Your VAMS export file contains the following recipient information:
- Date added to your clinic
- Salutation (if applicable)
- First name
- Last name
- Date of birth
- ZIP code
- VAMS ID
- External System ID (if entered)
- Email address (if provided)
- Cell phone number (if provided)
- Home phone number (if provided)
- Next Dose
- Only COVID-19 vaccination details will display in a Recipient Export.
- Vaccine name
- If pre-vaccination actions are complete
- Next COVID-19 vaccine eligible date (if applicable)
- Recipient type (e.g., Recipient or Other Recipient, if the recipient was added via the Other Recipients tab)
NOTE: You can export up to 5,000 recipient records at one time. If the export file does not successfully download to your device, please revise your export start date and time and end date and time and try again.
Reporting Side Effects for Recipients in VAMS: Frequently Asked Questions
You can use VAMS to perform tasks such as managing your clinic’s information and user access as well as access clinic data reports.
Click on the buttons below to go to the corresponding sections in this user manual.
Manage clinic shipping address; update your clinic’s identifiers including the Facility ID, Provider PIN, Parent Org ID; deactivate your clinic.
Edit a user record, remove a VAMS user, or add a multi-clinic user.
Reports available to view and export include: Vaccination Administration and Inventory-Vaccine Level.
Manage VAMS Clinic Information
Access and edit information such as your clinic’s shipping address; your clinic’s Facility ID, Provider PIN, and Parent Organization ID; and deactivate or reactivate your clinic in the Clinic Details window on the Clinic Setup tab.
To edit any of your clinic information referenced above:
- On the Clinic Setup tab, scroll to the Clinic Details window, then click the Edit button in the upper right-hand corner.
- Click Edit in the upper left of the Clinic Details page.
- Click Save after you’ve made the desired updates.
Managing Clinic Information: Frequently Asked Questions
Deactivate Your Clinic in VAMS
To deactivate your clinic when it is no longer needed to administer vaccines:
- Click the Deactivate button in the upper right of the Clinic Details window.
- A Deactivate Clinic pop-up appears and asks you to confirm deactivation. It also gives you the number of total booked appointments and vaccines in the clinic’s inventory.
- Click Deactivate Clinic to continue. If you change your mind, click Cancel.
NOTE: Deactivating a clinic in VAMS tells the system to:
- Send an email to the jurisdiction POC informing them the clinic is deactivated.
- Deactivate all vaccine inventory requests.
- Deactivating a clinic does not remove user permissions in VAMS.
- Once a clinic is deactivated, you must remove each clinic user from the system following the same process outlined in the next section, Manage VAMS Clinic Users.
If you would like to reactivate your clinic, simply click the Reactivate button in the upper right corner of the Clinic Details window.
- A pop-up window will appear, confirming you want to reactivate your clinic.
- Click Reactivate Clinic or Cancel.
- If you click Reactivate Clinic, another pop-up window will appear confirming your clinic was reactivated. Click Ok.
Locate Your Clinic QR Code (if applicable)
If your jurisdiction uses guest registration and your clinic allows for walk-in appointment scheduling (see Step 2: Register Your Clinic in VAMS for more information on allowing walk-in appointments), you will see a link for clinic-specific guest registration QR code at the top of your Clinic Portal home page. You can download and print this QR code to display in your clinic for recipients to scan. Scanning the code will take recipients directly to your jurisdiction’s guest registration site where they can answer the prescreening question(s), then complete their registration and schedule a walk-in appointment at your clinic.
Manage VAMS Clinic Users
On the Clinic Setup tab, in the Manage Users window, you can edit a user record, remove a VAMS user, or add a multi-clinic user.
Edit or Remove a VAMS Clinic User
- To edit a user’s information or remove a user, click the Drop–Down Arrow next to the user’s name in the Manage Users table.
- You can edit the user’s details by clicking the Edit button or remove the user by clicking the Remove button.
- If you edit the user’s record, click Save.
- If you click the Remove button, another window will appear and ask you to select the clinic(s) you want to remove the user from and confirm that you want to remove the user. The user will not be notified that they have been removed from your clinic.
-
- Select the Name(s) of the clinic(s) you want to remove the user from and click Next.
- The system will confirm the user has been removed. Click Finish to return to the Clinic Portal.
NOTE: To remove a user who has been assigned the clinic administrator role from your clinic, navigate to the Manage Users window, click on their Name in the Manage Users table, then click Remove in the top right corner of the screen. To completely remove a clinic administrator role from a user’s profile, you must submit a case on the Help page as described in User Access Support.
Multi-Clinic Users: Add a clinic user who is already a registered VAMS user
You can add a user to your clinic who is already a registered VAMS user at another clinic. The system will recognize the user through their email address.
- In the Add or Update User pop-up window, enter the user’s Email Address and click Search.
- NOTE: This feature searches to see if the user’s email address has been used to create an account in VAMS.
- You will know if a user’s email address has already been used to create a VAMS account if their first and last name are already populated and roles are already selected for them.
- The roles a user is assigned by another clinic’s administrator carry over to your clinic. Similarly, roles you select for them will carry over to any other clinic for which they are a VAMS user.
- For example: If you select the inventory role for a new healthcare professional (HP), they will also have that role at all other clinics for which they work.
- Similarly, if you remove the inventory manager role from this HP, they will no longer have that role at any other clinic for which they work.
After you add them as a user in your clinic, they will receive an email notification from vams@cdc.gov that they are identified as a user for your clinic, with a link for them to log into the VAMS portal. They will use the same VAMS login they use for other clinics.
After logging in and accessing the Clinic Portal, they will see all clinics they are linked to in VAMS, including yours.
Clinic Data Reports
There are three clinic data reports available to third-party clinics in VAMS.
- Inventory – Vaccine Level Report: Includes data on your clinic’s current inventory, including total doses remaining as well as doses remaining by manufacturer and product.
- Vaccination Administration Report: Includes a range of data on vaccines administered at your clinic, including recipient information, vaccine administration dates, administering healthcare professional information, and vaccine information.
- Inventory – Audit Report: Includes data on your clinic’s total inventory, including, total number of doses added, total number of doses wasted, and total number of doses remaining. Accessible to all Clinic Administrators.
Access to clinic data reports is dependent upon a user’s assigned role(s) in VAMS. User access for each report is noted below and below each report section header.
- Clinic users with only the Clinic Administrator role assigned in VAMS can view:
- Inventory – Vaccine Level Report for today. Note the inventory manager does not have access to this report since they do not have access to the Clinic Data tab.
- Inventory – Audit Report with only one file available.
- Clinic users with both the Clinic Administrator and Healthcare Professional roles assigned in VAMS can view this additional report:
- Vaccination Administration Report for data on vaccines administered at your clinic today, past 7 days, and past 30 days.
Access the Reports
Access your clinic’s reports from the Clinic Data tab. Under each report header, click the time frame to view its data and visualizations.
Vaccination Administration Report
- Who has access to this report: Clinic users with both the clinic administrator and healthcare professional roles assigned in VAMS.
This report includes the following data on vaccines administered at your clinic:
- Clinic name
- Clinic address
- Recipient name (first, middle, last)
- Recipient date of birth, gender
- Recipient mailing address (state, city, street, etc.)
- Recipient phone number, email address
- Recipient demographic information (race, etc.)
- VAMS System ID
- External System ID (if applicable)
- Recipient Patient: Account ID
- Recipient insurance information (if applicable)
- Date of vaccine administration
- Dose for each vaccination administered
- Administering healthcare professional name
- Recipient record creation date/time
- Vaccination record modification date/time
- Vaccine information (CVX code, manufacturer, product, UoU, NDC, dose, lot number, and expiration date)
- Vaccine status (number of doses received)
- If prevaccination actions are complete
- Follow-up vaccination date
- Recipient Patient: Account ID
The Vaccination Administration Report can be filtered by date administered:
- Today
- Past 7 days
- Past 30 days
Inventory – Vaccine Level Report
Who has access to this report:
- Clinic administrators
This report includes the following data on current clinic inventory:
- Total manufacturers
- Total doses remaining
- Doses remaining by manufacturer and product
- UoS lot numbers
- Vial expiration dates
NOTE: Inventory-Vaccine Level reports provide data on current inventory levels only.
Inventory – Audit Report
Who has access to this report:
- Clinic Administrators
This report includes the following data on vaccines administered at your clinic:
- Total doses added
- Total doses wasted
- Total doses remaining
- Reason for wastage
Interact with Report Data
After selecting and viewing a clinic data report, you can interact with the data by filtering, sorting, and grouping them and creating charts within the different reports.
- Filter: Filter data by clicking the Filter icon in the top right corner of the screen.
- Sort: Sort data by clicking the Arrow on the right side of each column header within a report. From the drop-down menu, you can select how you want to sort the data in the report.
- Group: Group data by clicking the Arrow on the right side of each column header within a report. From the drop-down menu, you can select to group the report by the data in that column by selecting Group Rows by This Field.
- Charts: Create charts to represent data by first grouping the data you want to transition into a chart.
After grouping your desired data (e.g., doses remaining by manufacturer), you can click Add Chart in the top right corner of the screen to create a chart. - After your chart is created, you can change the chart type by clicking the Gear icon on the top right corner of the chart.
Export Report Data
Export clinic data reports in Formatted or Details Only views.
- Formatted includes the report header, groupings, and filter settings and can only be exported in Excel (.xlsx) format.
- Details Only includes only the detail rows.
To export a report:
- From the Clinic Data tab, select the report and time frame you want to view (e.g., Vaccination Administration report for the past 30 days).
- Click Export in the top right corner of the screen.
- Select your Desired Export View (Formatted or Details Only). If choosing a Details Only view, select the File Type from the Format drop-down menu (.xls or .csv) and select from the Encoding Options drop-down menu.
- Click Export.
Congratulations! You have successfully exported the report and can access it as a downloaded file on your device.
Viewing Reports in VAMS: Frequently Asked Questions
Managing your clinic’s vaccine inventory will primarily be the inventory manager’s role, but as the clinic administrator, you also have access to manage it in VAMS.
This section will show you how to manage your clinic’s vaccine inventory in VAMS.
Click on the buttons below to go to the corresponding sections in this user manual.
The clinic administrator and/or inventory manager can submit inventory requests to your clinic’s jurisdiction POC.
Track inventory requests and communicate with jurisdiction POCs about them.
View information about vaccine-related packaging, labeling, and expiration dates.
Log vaccine inventory manually or via 2D barcode scanner (if available).
Reduce vaccine inventory manually or via 2D barcode scanner (if available).
Use the Inventory tab to monitor inventory levels and view snapshots of available and booked appointments.
Place Vaccine Inventory Requests
You will place your vaccine inventory requests in VAMS to your jurisdiction’s POC. This crucial process will allow you to ensure your clinic has enough inventory on hand to administer vaccines to recipients. While you will place all inventory requests in VAMS, the jurisdiction POC will place all vaccine orders outside of VAMS through an established process determined by the jurisdiction.
NOTE: Inventory requests let your jurisdiction know how much inventory you need. An inventory request does not place an order or guarantee you will receive all inventory requested right away. The jurisdiction will place an order through their public health agency for the amount of inventory they can accommodate.
You can place, view, and manage your inventory requests on the Inventory tab in VAMS. To place an inventory request, you’ll need to know your desired product type, the number of doses you want to request, which type of dose you want to request (e.g., first or second dose), and the date by which you need to receive the requested inventory.
The Inventory tab shows you a list of all inventory requests you’ve submitted. This list includes a system-generated inventory request number, product type (vaccine type) requested, manufacturer, date requested and required, number of doses requested, and notes.
- Click the Inventory tab on your clinic’s home page.
- Click the Drop-Down Arrow in the Inventory Requests window.
- Click New Request in the upper right corner of the Inventory Requests window.
- The Create Site Inventory Request pop-up window includes several required fields (noted by a red asterisk).
- Select the desired Vaccine Type from the drop-down menu.
- After selecting the vaccine type, select the desired Manufacturer and Product from their respective drop-down menus.
- Enter the Number of Vaccine Doses you are requesting.
- Enter the Date of your inventory request.
- Enter the Date by which you want to receive the doses you are requesting.
- Your clinic’s name will auto-populate in the clinic field. If you wish to change the clinic selection, click the “X” in the field to select from a list of clinics to which you are assigned.
- If desired, you can add a Note for the jurisdiction POC in the Clinic Notes field.
- Click Save to save your inventory request. VAMS will send your request to your jurisdiction POC.
Track Vaccine Inventory Requests
After your inventory request is submitted, a record of that request appears on the Inventory tab in the Inventory Requests window. The inventory request record shows important details about the request. It also offers a way to monitor and communicate with the jurisdiction POC.
- In the Inventory Requests window, click the Inventory Request Number hyperlinked in the list to access the inventory request record.
From the inventory request record, you can:
This section of the record has details about the inventory request.
Send the jurisdiction POC a message by typing in the Post box and clicking Share.
Like you would on a social media platform, click the Follow button to receive email notifications when the jurisdiction POC responds to a post you make in the inventory request record. You will not receive notifications for new posts.
Vaccine Information
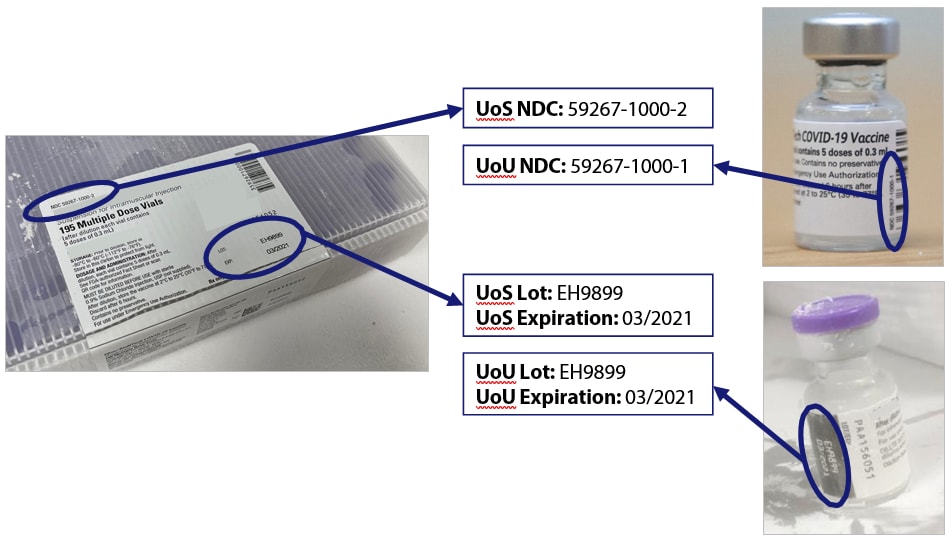
Vaccine Packaging Terms
- Unit of sale, or UoS, is the packaging in which the vaccine vials are delivered.
- Unit of use, or UoU, is the vaccine vial.
Example: One box, or UoS, could contain 10 UoUs, or vaccine vials.
Vaccine Labeling Terms
Lot Numbers
- UoS lot number is shown on the package label.
- UoU lot number is shown on the vial label.
NOTE: UoS and UoU Lot numbers will be the same.
National Drug Code or NDC Numbers
- UoS NDC is shown on the package label.
- UoU NDC is shown on the vial label.
NOTE: UoS and UoU NDC numbers will not be the same.
Expiration Dates
- For some manufacturers, expiration dates can be found on both the UoS and UoU labels. Others supply expiration date information on their website.
Examples of vaccine labeling are shown below.
Log Vaccine Inventory
When you receive a vaccine delivery, you can log it in VAMS in two ways:
- Manually enter the information on the vaccine packaging and vials.
- Use a 2D barcode scanner to scan the barcodes on the vaccine vials. This automatically enters the information in VAMS.
Log Vaccine Inventory Manually
- On the Inventory tab, click the Manually Log Inventory button.
- Select the Vaccine Type, Manufacturer, and Product from the drop-down menus. Enter the remaining vaccine information.
-
- NOTE: A warning message will appear on the Manually Log Inventory screen under the Expiration Date field if the inventory expiration date is in the past, but VAMS will not prevent you from logging the inventory.
- Click Next.
- Review and confirmthe information you entered is correct, then click Next.
- Click Finish in the pop-up window.
NOTE: You will be able to select between a 10- or 15-dose vial when logging Moderna inventory. The 10- and 15-dose Moderna vials are the same product but have different NDCs, which is why they are differentiated in VAMS.
The 15-dose Moderna vial is expected to yield 14 doses, so VAMS will add 14 doses every time a 15-dose vial is added to your inventory. If a 15th dose is administered from a vial, please add the extra dose individually.
Quick Tips:
- Enter UoU and UoS numbers without dashes (e.g., enter 5926710002, not 59267-1000-2).
- UoU and UoS lot numbers must be an exact match, including case.
- It’s possible you may enter new inventory that only partially matches an existing entry. If this happens, you will receive an error message. Follow the instructions in the message to invalidate the old record and add remaining inventory to a new record.
Log Vaccine Inventory by Scanning a 2D Barcode
VAMS is compatible with 2D barcode scanners (Bluetooth wireless and those that are not wireless). However, integrated mobile device scanning (i.e., an app that can scan a 2D barcode) will not connect with or automatically transfer information to VAMS.
- On the Inventory tab, click Scan Inventory.
-
- NOTE: You must scan each UoS individually. Each UoS contains multiple vials or UoUs. When logging inventory, you must scan one UoU from each UoS. See the step-by-step instructions below.
- When the Scan Inventory pop-up appears, scan the UoS barcode on the vial with your 2D barcode scanner. The barcode will appear in the UoS barcode field.
- Select the Vaccine Manufacturer from the drop-down menu, then click Next.
- The UoS Information screen will appear with prepopulated UoS information. Enter the Total UoU (vials) in UoS, then click Next.
- Scan the UoU barcode on one of the vials from the UoS you are logging, and it will appear in the UoU Barcode field, then click Next.
- Review and confirm the information you entered is correct, then click Next.
- Click Finish in the pop-up window.
Reduce Vaccine Inventory
Similar to how you log vaccine inventory, you can reduce vaccine inventory in VAMS in two ways:
- Manually enter the information on the vaccine packaging and vials.
- Use a 2D barcode scanner to scan the barcodes on the vaccine vials.
Reduce Vaccine Inventory Manually
- On the Inventory tab, click the Manually Reduce Inventory button.
- Select the Vaccine Type, Manufacturer, and Product from the drop-down menus. Enter the remaining vaccine information.
- The expiration date will auto-populate and cannot be changed.
- Select a Reason for Reduction.
- Enter the number of doses reduced, then click Next.
-
- NOTE: VAMS will not allow you to reduce more inventory than you have on hand.
- Review and confirm the information you entered is correct, then click Next.
- Click Finish in the pop-up window.
Reduce Vaccine Inventory by Scanning a 2D Barcode
- On the Inventory tab, below the available appointments data, click the Reduce Inventory (Scan) button.
- When the Reduce Inventory (Scan) pop-up window appears, scan the UoU barcode on the vial with your 2D barcode scanner.
- Enter the required information in the Reduce Inventory pop-up window. The expiration date will auto-populate and cannot be changed. Click Next.
- Review and confirm the information you entered is correct, then click Next.
- On the next screen, click Finish.
Edit an Inventory Line Item
Once you have added inventory, you can edit specific inventory records (either add or reduce units). This offers a streamlined way to manage specific records.
- On the Inventory tab, scroll to the On-Hand Inventory Totals window.
- Select the Hyperlinked Lot Number for which you are trying to update inventory total.
- At the top of the Site Inventory page, click Log Inventory or Reduce Inventory to adjust inventory totals from the specific record as needed.
- If you are logging inventory:
- Select Vial (UoU) or Individual Dose(s). Enter the Total UoU (vials) in UoS or Number of Doses.
- If you are reducing inventory:
- Select the Reason for Reduction.
- Enter the Number of Doses Reduced.
- Click Yes to proceed with logging or reducing inventory or No to cancel.
- NOTE: Clinic Administrators and inventory managers can manually log and manually reduce Moderna inventory in increments of 0.5.
Invalidate Inventory
If there is an error in existing inventory, you can invalidate that inventory record.
- On the Inventory tab, scroll to the On-Hand Inventory Totals window.
- Select the Hyperlinked Lot Number for which you are trying to invalidate.
- Click invalidate.
- Review the warning message. Click Yes to proceed with invalidating the inventory or No to cancel.
If you clicked Yes, in the On-Hand Inventory Totals list, the record status will read Invalid.
Monitor Vaccine Inventory Levels
Clinic administrators and inventory managers can use the Inventory tab to monitor inventory levels and view snapshots of available and booked COVID-19, Mpox, and routine vaccine appointments. This tab gives you a complete view of important information about your vaccine inventory level.
Select a Vaccine Type from the Vaccine Type drop down menu to view a snapshot of the following information for the chosen vaccine type:
- The number of scheduled appointmentsat your clinic over the next 28 days (including the current day).
- The total number ofappointments scheduledat your clinic.
- The total number of vaccine doses your clinic has in its on-hand vaccine inventory*.
*The total on-hand inventory data on this tab come from the inventory you log and reduce in VAMS as well as what your clinic healthcare professional logs during vaccine administration. The healthcare professional’s method of logging inventory and waste is similar to yours. They can either scan a 2D barcode or log the information manually.
Inventory will automatically update if a healthcare professional edits a recipient’s vaccination record to change a lot number or type of vaccine. Once the change is made, it will update across the system and there will be no further action required by the inventory manager or clinic administrator.
NOTE: For a more detailed inventory report, see Clinic Data Reports in Section 3 of Clinic Management in VAMS for how to access the Inventory-Vaccine Level Report. As inventory managers do not have access to the Clinic Data tab, they cannot view the Inventory-Vaccine Level Report.
If you need to edit a vaccine lot number’s expiration date, follow these steps:
- Navigate to the On-Hand Inventory Totals window on the Inventory tab.
- Click the hyperlinked UoS Lot Number of the inventory you wish to update.
- Scroll to the bottom of the page you are directed to until you see Expiration Date.
- Click the Pencil icon to the right of the expiration date and enter the Correct Expiration Date for that lot number.
- Click Save.
Vaccine Inventory: Frequently Asked Questions
This section will show you how to perform other clinic administration tasks in VAMS that occur less frequently than the tasks described in Clinic Management in VAMS, such as accessing VAMS support, or actions that will only apply to certain users, such as those who work at multiple clinics.
Click on the buttons below to go to the corresponding sections in this user manual.
Access different clinics in VAMS if you work at multiple vaccination clinics.
Review recommended activities leading up to and during scheduled VAMS
Know how to find answers to frequently asked questions (FAQs) about VAMS and submit questions to the VAMS Help Desk.
Access Multiple Clinics in VAMS
You may need to perform the same or different user roles at multiple clinics. After the clinic administrator at each clinic adds you as a user for their clinic, you can easily access multiple clinics after logging into VAMS.
- From any page in VAMS, click the Drop-Down Arrow next to your name in the upper right corner to access the drop-down menu.
- Click Switch Portals.
- If you have multi-portal access (i.e., you have access to more than one portal—Clinic Portal and Recipient Portal, for example) this will take you to the Portal Selection page. Click the Clinic Portal button, then you will see the Clinic Selection page.
- If you only have multi-clinic access (i.e., you have a clinic role at more than one clinic but do not have access to another portal) clicking Switch Portals will take you straight to the Clinic Selection page.
- From the Clinic Selection page, choose which clinic you want to switch to by clicking the Access Portal button under the clinic name.
Accessing Multiple Clinics: Frequently Asked Questions
VAMS Downtime Procedures
VAMS is occasionally taken down for scheduled system maintenance. All VAMS functions are unavailable for all users during these scheduled downtimes. You will be notified prior to scheduled system downtimes.
All users should consider any processes they may need to complete prior to the downtime, such as:
- Reviewing inventory requests,
- Downloading data reports,
- Completing Pre-vaccination actions, and
- Viewing/printing vaccination certificates
Quick Tip: If you need help with access to vaccination certificates, visit the quick reference guide, “Accessing Vaccination Certificates in VAMS”.
Clinics should consider these temporary processes so they can continue to administer vaccine successfully during downtimes:
- Review your upcoming appointments to see if your clinic has scheduled appointments during this time.
- Print or otherwise document the names of recipients who have appointments during this time.
- Print CDC’s Pre-vaccination Screening Checklist: www.cdc.gov/vaccines/covid-19/downloads/pre-vaccination-screening-form.pdf
- Print FDA’s Emergency Use Authorization Fact Sheets, if necessary: www.cdc.gov/vaccines/covid-19/eua/index.html
- Print CDC’s Immunization Information System Data Requirement Form to document the vaccine administration information so you can add it into VAMS when the system comes back online: www.cdc.gov/vaccines/covid-19/reporting/downloads/IIS-data-requirement-form.pdf.
- Work with the healthcare professionals at your clinic to make a plan to enter the data from these appointments in VAMS as soon as possible.
- Healthcare professionals can manually enter the Vaccination Date and Time while logging any recipient’s vaccination. They can also record vaccinations on behalf of another healthcare professional using the Record Past Vaccination(s) button on the Recipient Management tab. You can learn more about this functionality in the VAMS Healthcare Professional Standard and Mobile Clinic User Manual.
VAMS Maintenance: Frequently Asked Questions
User Access Support
Quick Tip: Some users may not be able to access VAMS and may request your help in gaining access. A quick reference guide on troubleshooting for user access is available with a list of solutions. Additional FAQs about accessing VAMS can be found on the “Getting Started in VAMS” page. You can also find support within VAMS by clicking the Help Link in the upper right corner of the navigation bar.
Submit a Question to the VAMS Help Desk
- From the Help page, click Submit a Question.
- Click Submit a Case and select New Clinic Case.
- When logged into the system, your name and email address will be prepopulated in your case.
- Select the Category of your question (and Subcategory, if applicable), select your Jurisdiction, type the Subject of your question, then type your Question in the text box.
- After clicking Confirm, a message will appear on the screen confirming your question was sent.
- Once you receive a response to your question, you can communicate back and forth with the support team by replying to the email.
NOTE: Do not edit the subject line of the email or the support team member who initially responded to your question will not receive it.
For additional support, complete the contact form for the VAMS Help Desk.
Toll-Free Number | +1 833-748-1979
Email: CARS_HelpDesk@cdc.gov
Hours of Operation | 8:00 AM – 8:00 PM EST | Monday – Friday