Crystal® VC Rapid Diagnostic Test (RDT) Procedure
Print-and-Go Fact Sheet

- Crystal® VC Rapid Diagnostic Test (RDT) Procedure – English (for print only) [PDF – 1 page]
- Crystal® VC Rapid Diagnostic Test (RDT) Procedure – Haitian Creole (for print only) [PDF – 1 page]
- Crystal® VC Rapid Diagnostic Test (RDT) Procedure – Français (for print only) [PDF – 1 page]
- Crystal® VC Rapid Diagnostic Test (RDT) Procedure – Español (for print only) [PDF – 1 page]
- Crystal® VC Rapid Diagnostic Test (RDT) Procedure – Swahili (for print only) [PDF – 1 page]
- Crystal® VC Rapid Diagnostic Test (RDT) Procedure – Arabic (for print only) [PDF – 1 page]
- Crystal® VC Rapid Diagnostic Test (RDT) Procedure – Amharic (for print only) [PDF – 1 page]
- Crystal® VC Rapid Diagnostic Test (RDT) Procedure – Portuguese (for print only) [PDF – 1 page]
IMPORTANT: Wear appropriate personal protective equipment while performing this test.
- Label 5 ml test tube with patient identifier. Set aside.
- Ensure the reagent bottle is intact and solution is not turbid or discolored. Discard bottle if unsatisfactory.
- Unscrew the sample processing vial and add sample.
- For solid, semisolid, or viscous stool, use the sampling stick to collect a small portion of stool from two or more areas in the sample and insert in the sample processing vial. NOTE: “Stab” do not “scoop” to avoid picking up particulate matter that may clog the dipstick membrane.
- For liquid stool, use transfer pipette to add 2 drops of sample to the sample processing vial.
- Tightly recap sample processing vial and shake to mix contents.
- Break the outer end of the cap from the sample processing vial.
- Dispense 4 drops of processed sample into labeled 5 ml test tube.
- Carefully open aluminum pouch along perforated line.
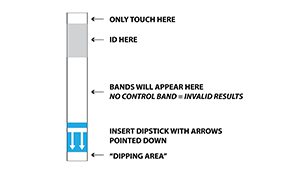
- Inspect contents. REMINDER: Only touch the top of the dipstick.
- Check dipstick for damage (e.g., no tears, splits, discoloration).
- Ensure the pouch contains desiccant that has not changed white in color.
- Discard dipstick if damaged, or if desiccant is missing or changed to white in color.
- Label top of dipstick with patient identifier.
- Place the dipstick in the test tube with the arrows facing DOWN.
- Confirm the end of the dipstick (“the dipping area”) is submerged in the processed sample. NOTE: The arrows should remain above the level of the sample.
- Wait 15-30 minutes, remove dipstick and read the result. (See table below for results interpretation.)
- Place all waste in a double-lined plastic bag labeled “Biohazard.”
| Interpretation* | Pinkish red band observed | ||
|---|---|---|---|
| O1 | O139 | Control | |
| A. Vibrio cholerae O139 detected | – | + | + |
| B. Vibrio cholerae O1 detected | + | – | + |
| C. Vibrio cholerae O1 and O139 detected | + | + | + |
| D. Vibrio cholerae O1 and O139 not detected | – | – | + |
| E. Invalid results | + or – | + or – | – |
*Control band must appear for the result to be considered valid.

Schematic View of Dipstick
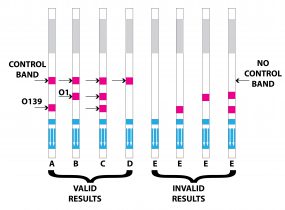
Schematic Interpretation of Results