Jurisdiction Point of Contact (POC) User Manual
Your Role and Activities in VAMS
As a jurisdiction POC, VAMS serves as your primary tool for managing critical functions and oversight of vaccine distribution to clinics in your jurisdiction. Your role ensures that vaccine administration is consistent across your jurisdiction, avoiding variations in data quality and availability.
You will also use VAMS to:
- Collect accurate, near real-time, de-identified, record-level data,
- Track and monitor vaccine administration, and
- Promote real-time awareness of all of the above
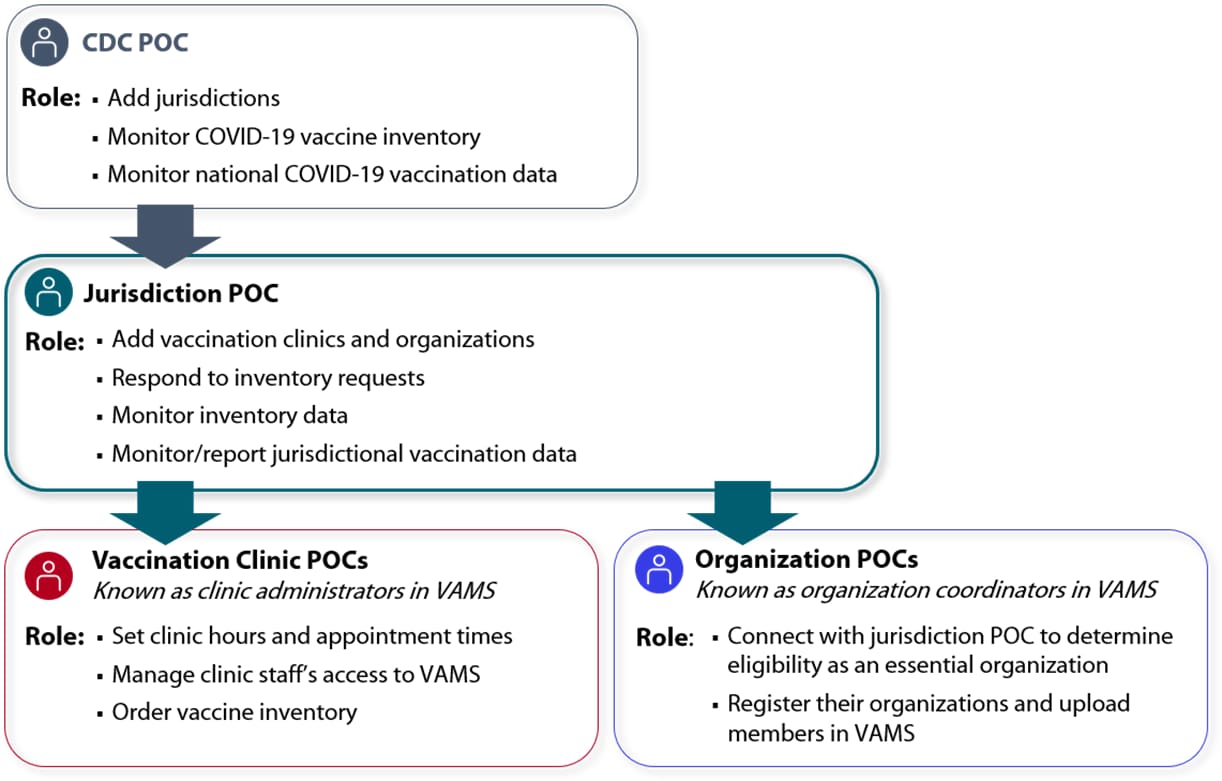
You will interact with three groups during ongoing vaccination efforts:
- Centers for Disease Control and Prevention (CDC)
- Vaccination clinics who will administer vaccines in your jurisdiction
- Organizations of priority group workers (including volunteers) in your jurisdiction
You likely already have a CDC point of contact (POC). However, vaccination clinics and organizations need to select someone in their organization to be your POC.
In addition to your own role, this diagram provides an overview of the roles and responsibilities for each group’s POC and shows the flow of information from one POC to another.
Manage Jurisdiction Users
Click the Manage Users tab to search for and view details of the jurisdiction POCs within your jurisdiction. Select the My Jurisdiction Users list view from the drop-down menu.
Add a Jurisdiction User to Your Jurisdiction
- Click Add or Update User. In the pop-up window, enter the Email Address of the jurisdiction user whom you wish to locate and click Search.
- If this user exists in the system, then their information will be pre-populated, and you will be able to see their associated jurisdiction POC role. Click Save.
- If this user does not exist in the system, you will have to enter their information.
- Assign the Jurisdiction POC role to the user. Click Save.
- Once complete, you will have officially added a jurisdiction user to your jurisdiction.
Update a Jurisdiction User’s Information
- Check the Box next to the jurisdiction user whose information you would like to update and click Add or Update User.
- NOTE: You can only select one user at a time to make changes.
- The user’s email will be pre-populated in the pop-up window. Click Next. The user’s information will be prepopulated.
- Review the jurisdiction user’s information and associated role. Click Save.
- NOTE: Unselecting a role under the Add or Update User window will not remove the user from that role.
Remove a Jurisdiction User
- Check the Box next to the jurisdiction user whom you would like to remove from the jurisdiction and click Remove User.
- In the pop-up window, click Remove to confirm that you want to proceed with removing this user from the jurisdiction.
- Once complete, you will have officially removed the jurisdiction user from the jurisdiction.
Data Entry in VAMS: Frequently Asked Questions
Types of Email Notifications Users Should Expect From VAMS
While users can select their preferred method of communication to be email or SMS text, some communications will always be sent through email. You may receive email notifications from the following five email addresses:
- vams@cdc.gov
- no-reply@mail.vams.cdc.gov
- no-reply@envelope.mail.vams.cdc.gov
- VAMSHelp@cdc.gov
- *@salesforce.com
Please work with your IT team to ensure these emails do not get sent to your spam folder.
vams@cdc.gov will be auto-generated emails related to Clinic, Jurisdiction, Organization Portal messages such as:
- Registration links to new VAMS users
- Re-occurring two-factor authentication for logins
- Updates on inventory requests
no-reply@mail.vams.cdc.gov and no-reply@envelope.mail.vams.cdc.gov will be auto-generated emails related to the Recipient Portal such as:
- The initial two-factor authentication code
- Links for recipients to complete Pre-vaccination Questionnaires
- Reminders about upcoming recipient appointments
VAMSHelp@cdc.gov will be:
- Communications from the VAMS Help Desk
*@salesforce.com: Depending on some email server configurations, we have heard of rare cases where emails are delivered directly from Salesforce. Potential cases include password resets and interacting with VAMS Help Desk agents.
Account Creation: Frequently Asked Questions
Click on the buttons below to go to the corresponding sections in this user manual.
Clinic Portal Roles in VAMS
There are four roles available in the Clinic Portal:
- Clinic administrator (CA)
- Inventory manager (IM)
- Front desk (FD)
- Healthcare professional (HP)
Depending on the clinic type, only some of the roles must be filled for a clinic to operate successfully. The VAMS Role and Activity Matrix below provides a brief summary of the Clinic Portal roles and their activities in VAMS.
| Clinic Portal Roles | CA | IM* | FD** | HP |
|---|---|---|---|---|
| Serve as the clinic POC for your jurisdiction. | ■ | |||
| Manage clinic information (e.g., shipping address). | ■ | |||
| Set and manage clinic schedule (standard and mobile clinics only). | ■ | |||
| Manage clinic vaccine inventory. | ■ | ■ | ||
| Manage (add, edit, remove) VAMS clinic users. | ■ | |||
| Check in recipients, create walk-ins, or cancel appointments (standard and mobile clinics only). | ■ | |||
| Administer vaccine or COVID-19 tests to recipients. | ■ |
*Optional role for all clinic types since the clinic administrator can also perform inventory management tasks
**Front desk role is not used in VAMS for third-party clinics since they do not check in recipients in VAMS
If you have questions about specific roles in VAMS, role-specific user manuals are available within “Resources for Jurisdictions, Clinics and Organizations”. For instructions on how to perform specific tasks in VAMS, quick reference guides are also available on this page.
Manage Clinic Users
Click the Manage Users tab to search for and view details of the clinic users within your jurisdiction. Select the My Clinic Users list view from the drop-down menu.
Add a Clinic User to Your Jurisdiction
- Click Add or Update User. In the pop-up window, enter the Email Address of the clinic user whom you wish to locate and click Search.
- If this user exists in the system, then their information will be pre-populated, and you will be able to see their associated role(s).
- Add any role(s) you wish to assign to the user. Click Next.
- You will see a list of all clinics under the jurisdiction; the clinic(s) that the user is associated with will be pre-selected. Check the Box next to any clinic(s) with which you would like the user to be associated. Click Save.
- If this user does not exist in the system, you will have to enter their information.
- Add any role(s) you wish to assign to the user. Click Next.
- Check the Box next to any clinic(s) with which you would like the user to be associated. Click Save.
- If this user exists in the system, then their information will be pre-populated, and you will be able to see their associated role(s).
- Once complete, you will have officially added a clinic user to your jurisdiction, with assigned role(s) and clinic(s).
Update a Clinic User’s Information
- Check the Box next to the clinic user whose information you would like to update and click Add or Update User.
- NOTE: You can only select one user at a time to make changes.
- The user’s email will be pre-populated in the pop-up window. Click Next. The user’s information will be prepopulated.
- Review the clinic user’s information and associated role(s). Add any role(s) you wish to assign to the user. Click Next.
- NOTE: Unselecting a role under the Add or Update User window will not remove the user from that role.
- You will see a list of all clinics under the jurisdiction. The clinic(s) that the user is associated with will be pre-selected. Check the Box next to any additional clinic(s) with which you would like the user to be associated. Click Save.
- NOTE: Unselecting a clinic will not remove the user from that clinic.
- Once complete, you will have officially updated the assigned role and/or clinic information of a clinic user within your jurisdiction.
Remove a Clinic User
- Check the Box next to the clinic user whom you would like to remove from clinic(s) in your jurisdiction and click Remove User.
- In the pop-up window, click Next to confirm that you want to proceed with removing this user from their associated clinic(s).
- Unselect the Box(es) next to the clinic(s) from which you would like to remove the user and click Yes.
- NOTE: The Clinic Administrator role can only be removed by a system administrator. Please contact the Help Desk if this change is required.
- NOTE: If you remove a user from a clinic, the user will be removed from all their roles within that clinic.
- Once complete, you will have officially removed the clinic user from the clinic(s) of your choice within your jurisdiction.
Clinic Types in VAMS
In VAMS, clinics are assigned to a Clinic Type (e.g., Standard, Mobile, Third-Party, etc.).
Clinics are then further assigned to one of seven Clinic Service types. These Clinic Services include:
- Vaccinations
- COVID-19 Testing
- Scheduling
- School-Located Vaccinations
- Field-Located Vaccinations
- Vaccines for Children
- Other
NOTE: If the Clinic is set up as a Third-Party Clinic, the only Clinic Services available for selection will be Vaccinations, COVID-19 Testing, and Scheduling.
To learn more about the different Clinic Types and Clinic Services within VAMS, visit the Quick Reference Guide for Clinic Types.
Add Clinics One at a Time or Via Bulk Upload
You can add vaccination or testing clinics one at a time or you can add multiple clinics at once via bulk upload from the Manage Clinics tab. First, we will learn how to add one clinic at a time, then how to bulk upload them.
Add Clinics One at a Time
NOTE: The fields marked with a red asterisk (*) are required.
- Click Add Clinic on the Manage Clinics tab.
- Enter the Clinic POC’s Information.
- Click Next.
Quick Tip: Click Back to State Portal to cancel this process. Cancelling the process deletes any clinic information entered so far in the process.
- Enter the Clinic’s Information.
- Select a Clinic Type (e.g., Standard, Mobile, Third-Party, etc.) from the drop-down menu.
- Select a Clinic Service from the drop-down menu.
-
- The Clinic Services drop-down enables you to indicate whether the new clinic will offer Vaccinations, COVID-19 Testing, Scheduling-Only, School-Located Vaccinations, Vaccines for Children, Field-Located Vaccinations, or Other.
- NOTE: If the Clinic is set up as a Third-Party Clinic, the only Clinic Services available for selection will be Vaccinations, COVID-19 Testing, and Scheduling.
- NOTE: Only standard clinics can be set up as COVID-19 testing clinics.
- NOTE: Once a clinic is set up for a certain service, it cannot be changed.
- The Clinic Services drop-down enables you to indicate whether the new clinic will offer Vaccinations, COVID-19 Testing, Scheduling-Only, School-Located Vaccinations, Vaccines for Children, Field-Located Vaccinations, or Other.
- Although the Provider PIN, Facility ID, and Parent Organization ID fields are not marked with a red asterisk, you must enter that information when adding clinics in VAMS unless you are told it is not required for your jurisdiction.
- The Provider PIN identifies the facility for ordering in VTrckS, the Facility ID is required for CDC reporting, and the Parent Organization ID is required for HL7 integration.
- Click Next.
- Review all information entered on the Register Vaccination Clinic pages and verify it is correct. If so, click Next. If not, click Previous to make corrections.
- NOTE: Once added, you cannot change most information associated with a clinic in VAMS, so review carefully prior to clicking Next on the Review
- After clicking Next, a message appears confirming the clinic is added to the system.
- Once they are added, clinic POCs receive an email from vams@cdc.gov with a link to activate their account and register their clinic in VAMS.
NOTE: To prevent duplication of clinic entries, VAMS will not add a clinic with the same address as a previously added clinic. If this occurs, you will receive an error message stating a clinic located at that address is already entered in the system.
Adding Clinics in VAMS: Frequently Asked Questions
Add Clinics via Bulk Upload
Bulk uploading allows you to add multiple clinics at once by adding their information in a comma delimited (.csv) template and uploading it in VAMS.
- Click Import Clinics on the Manage Clinics tab.
- Click the Clinic Import Template link in the pop-up window that appears. After clicking the link, the template file will download to your computer.
- NOTE: Always ensure you download and use the latest version of the import template each time you attempt to bulk upload clinics in VAMS to take advantage of constant improvements and to avoid data issues/inconsistencies.
- Open the file and enter the Clinics’ Information.
- Save the file as a CSV UTF-8 (Comma delimited) (.csv) You can find this option under the Save As drop-down menu in Excel.
- Click Upload Files in the Import Clinic List pop-up window. You can also drag and drop your clinic list in the Drop Files area of the page.
- Click Close.
Important Notes about the Clinic Import Template File:
- The file opens on your computer as an .xlsx file, but you must save it as a CSV UTF-8 (Comma delimited) (.csv) file after entering all information and before uploading it to VAMS. No other types of csv files are accepted.
- You must use the latest version of the template when uploading a list of clinics in VAMS.
- All fields marked with an asterisk in the template are required.
- VAMS will not upload a clinic if any of the required fields are blank.
- Fields that contain a pick list or drop-down options must contain a selection.
- VAMS will not upload duplicates if a clinic is listed in the CSV file multiple times or if the clinic has already been added in VAMS.
- After inputting clinic information and saving the Clinic Import Template as a CSV UTF-8 file, you should close the file and immediately upload it into VAMS. Do not reopen the file on your computer between conversion and upload. In some cases, reopening the file after saving as a CSV UTF-8 file could alter field properties and cause the recipient upload to fail.
Quick Tip: A comma-separated values (CSV) file is a delimited text file that uses a comma to separate values. A CSV file stores tabular data (numbers and text) in plain text.
Confirm Bulk Upload
After importing a list of clinics, these processes automatically occur in VAMS:
- A message appears on screen that your list is in the import queue.
- VAMS sends a registration email to each clinic POC if their information was entered in the CSV file completely.
- After your list has processed, you will receive an email from vams@cdc.gov, stating it has been uploaded
- A result log appears on the Clinic Imports tab.
- Click the Clinic Imports tab to check the results of your bulk upload.
- On the Clinic Imports tab, you see information about your upload, including the system-generated Import ID number, who imported the list, and when it was imported.
- Click the Import ID number of the clinic import to open the Import Details page.
There are two main sections on the Import Details page:
- Import Details, which includes the import ID, jurisdiction name, who created it, and the date created
- Files table, which includes two files: a Result Log for Bulk Upload and the clinic import file you uploaded.
- The Result Log for Bulk Upload file shows the results of your file upload.
- Click the Result Log for Bulk Upload link to open the file.
- Scroll to the right until you see the Status column. The Status column shows whether a clinic was added in the system.
- If there were duplicates or missing information in the CSV file, you will see an error message telling you why a clinic was not uploaded.
- All clinics that have a status of Success are uploaded in the system. Clinics with a status that includes an error message have not been uploaded in the system.
Search and View Clinics
Click the Manage Clinics tab to search for and view details of the clinics you’ve entered in VAMS.
- NOTE: You will only be able to view the clinics added in your jurisdiction.
Search for a Clinic
The Manage Clinics tab offers multiple ways to search and sort data.
- On the Manage Clinics tab, you can sort by clicking the Arrows in the columns to sort them by the column headers (e.g., name, email) or use the search bar to enter information such as clinic name, clinic POC, email address, or status.
View Details of a Clinic in Your Jurisdiction
- Click the Name of a clinic to see detailed information.
- NOTE: Most fields on the Details page are read-only for the jurisdiction POC.
Manage Clinics
Clinic Status
The list of clinics you entered will appear on the Manage Clinics tab. The far-right column shows the clinic’s status. This field is read-only and shows a clinic’s registration status as one of the below.
- Pending clinic admin registration: The clinic is entered in VAMS, but the clinic’s administrator has not registered their account.
- Active: The clinic’s administrator registered their account.
- Inactive: The clinic is deactivated in VAMS (information on when and how to deactivate a clinic in VAMS is below).
Deactivate Clinics in VAMS
You can deactivate a clinic when it is no longer needed to administer vaccines.
- Click theName of the clinic you want to deactivate on the Manage Clinics page
- Click Deactivate Clinic in the top right corner of the clinic’s account page.
- Review the data shown in the Deactivate Clinic pop-up window, which includes the number of total booked appointments and vaccines in the clinic’s inventory.
- Click Deactivate Clinic. If you do not want to deactivate the clinic, click Cancel to close the pop-up window and return to the clinic’s account page.
NOTE: Take caution in deactivating a clinic in VAMS as it signals the system to do the following:
- Send an email to the clinic’s administrators telling them the clinic is deactivated.
- Send a cancellation email to recipients with booked appointments.
- Cancel all appointments booked by recipients at the clinic.
- Remove the clinic from the list of searchable clinics.
- Deactivate all clinic inventory requests.
- Close all open appointments.
Once you add organizations in VAMS, organization coordinators will receive a registration email so they can activate their user account and register their organization in VAMS. After successfully registering their organization, the organization coordinator can provide their members with two ways to register themselves in VAMS:
- The organization coordinator can add them in the system one at a time or via bulk upload which will trigger a registration email to be sent from VAMS to each member.
- The organization coordinator can provide them with a common registration link that is established when an organization is authorized for Policy Enabled Registration or PER.
Click on the buttons below to go to the corresponding sections in this user manual.
Policy Enabled Registration (PER)
Policy enabled registration allows an organization to provide a common registration link to their members. The benefit of using PER is that an organization coordinator does not have to add each organization member into VAMS.
For an organization to use PER for their members, you must authorize them to do so, and they must provide you with at least one but up to three email domain names (e.g., fultoncounty.gov, fultoncounty.org, etc.) to enter in their organization record. The limitation is that whoever gains access to the common registration link and possesses an email address with one of the domain names provided by the organization coordinator, can register as a recipient.
How PER Works for Organizations and their Members
- After registering, the organization coordinator will see an organization-specific registration link above the tabs within their portal that they can distribute to their members.
- Members will access VAMS using the URL that is distributed from the organization, entering their name and organization email address that has the domain provided to you by the organization coordinator.
- The system will validate the email entered by the member has the same domain as one of the domains entered in the organization’s record.
- VAMS will send a unique registration link to the member email (e.g., username@domain.com).
- Members will click the registration link and start the standard registration flow at prescreening. They will then enter personal and insurance (if applicable) information.
NOTES:
- Third-party email domains such as Yahoo Mail or Gmail cannot be used for PER. Domains used must be owned by the organization or an affiliate.
- Members cannot change their email after they’ve registered in VAMS.
Organization Authorizations: Frequently Asked Questions
Add Organizations in VAMS
Information You’ll Need to Add Organizations in VAMS
- Organization POC’s information (first name, last name, email address). Note that the organization POC is referred to as the organization coordinator in VAMS. An organization POC can add additional coordinators in the system after registering but there can only be one POC per organization.
- Organization name
- Organization category (e.g., inpatient healthcare professionals, etc.)
- Organization State, ZIP/Postal Code, and Country
- Whether the organization has or has not been authorized for PER
NOTE: This must be done when you first add the organization in VAMS as you cannot edit an organization’s record after adding it in the system.
Before Adding New Organizations in VAMS
Ensure you have proactively communicated with them about the IT recommendations below to expressly permit VAMS notifications from specific email and IP (internet protocol) addresses to be received by their systems. Ensure you have also communicated with and trained new organizations before providing access to the live VAMS site.
Allow notifications from specific email addresses
To ensure communications do not get delayed or blocked by an organization’s exchange servers, advise them to work with their IT departments to allow notifications from the following email addresses:
- vams@cdc.gov
- no-reply@mail.vams.cdc.gov
- no-reply@envelope.mail.vams.cdc.gov
- VAMSHelp@cdc.gov
- *@salesforce.com
Allow notifications from specific IP addresses
Allowing email from specific IP addresses will also greatly improve email deliverability in a timely fashion. Advise organization coordinators to coordinate with their IT department to allow the email addresses above as well as email from the following IPs:
Salesforce
96.43.152.64 – 96.43.152.80 (subnet mask = 255.255.255.0)
96.43.153.64 – 96.43.153.80 (subnet mask = 255.255.255.0)
Amazon Web Services
23.251.255.1 – 23.251.255.150
23.251.253.228 – 23.251.254.250
54.240.40.1 – 54.240.40.54
Add Organizations One at a Time or Via Bulk Upload
You can add organizations one at a time or you can add multiple organizations at once via bulk upload from the Manage Organizations tab. First, we will learn how to add one organization at a time, then how to bulk upload them.
Add Organizations One at a Time
- Click Add Organization on the Manage Organizations tab.
- Enter the Organization POC’s Information.
- Click Next.
- Enter the Organization’s Information.
- Click Next.
- If an organization becomes authorized or unauthorized for PER after you have added them in VAMS, you can submit a help desk ticket to change their record. More information on how to submit a help desk ticket can be found in the Access Support section of this manual.
- Review all information entered on the Register Organization pages and verify it is correct. If so, click Next. If not, click Previous to make corrections.
- NOTE: Once added, you cannot change information associated with an organization in VAMS, so review carefully prior to clicking Next on the Review page.
- After clicking Next, a message appears confirming the organization is created in the system. Their status will be Pending Organization Admin Registration until the organization’s coordinator activates their account and registers the organization in VAMS.
- Once added, the organization coordinator receives an email from vams@cdc.gov with a link to activate their account and register their organization in VAMS. If an organization coordinator has yet to register in VAMS five days after receiving their registration link, VAMS automatically sends a reminder email to the member. Reminder emails will continue until the organization coordinator registers or until five consecutive reminders have been sent.
Adding Organizations in VAMS: Frequently Asked Questions
Add Organizations via Bulk Upload
Bulk uploading allows you to add multiple organizations at once by adding their information in a comma delimited (.csv) template and uploading it in VAMS. NOTE: The template does not have a place to record PER information, so organizations that have been authorized to use PER must be added in VAMS individually.
- Click Import Organizations on the Manage Organizations tab.
- Click the Organization Import Template link in the pop-up window that appears. After clicking the link, the template file will download to your computer.
NOTE: Always ensure you download and use the latest version of the import template each time you attempt to bulk upload organizations in VAMS to take advantage of constant improvements and to avoid data issues/inconsistencies.
- Open the file and enter the Organizations’ Information.
- Save the file as a CSV UTF-8 (Comma delimited) (.csv) You can find this option under the Save As drop-down menu in Excel.
- Click Upload Files in the Import Organization List pop-up window. You can also drag and drop your organization list in the Drop Files area of the page.
- Click Close.
Important Notes about the Organization Import Template File:
- The file opens on your computer as an .xlsx file, but you must save it as a CSV UTF-8 (Comma delimited) (.csv) file after entering all information and before uploading it to VAMS. No other types of csv files are accepted.
- You must use this template when uploading a list of organizations in VAMS.
- All fields marked with an asterisk (*) are required.
- Fields that contain a pick list or dropdown options must contain a selection.
- VAMS will not upload an organization if any of the required fields are blank.
- VAMS will not upload duplicates if someone is listed in the csv file multiple times.
- After inputting clinic information and saving the Clinic Import Template as a CSV UTF-8 file, you should close the file and immediately upload it into VAMS. Do not reopen the file on your computer between conversion and upload. In some cases, reopening the file after saving as a CSV UTF-8 file could alter field properties and cause the recipient upload to fail.
Quick Tip: A comma-separated values (CSV) file is a delimited text file that uses a comma to separate values. A CSV file stores tabular data (numbers and text) in plain text.
Confirm Bulk Upload
After importing a list of organizations, these processes automatically occur in VAMS:
- A message appears on screen that your list is in the import queue
- VAMS sends a registration email to each organization’s coordinator if their information was entered in the CSV file completely
- After your list has processed, you will receive an email from vams@cdc.gov, stating it has been uploaded
- A result log appears on the Organization Imports tab
- Click the Organization Imports tab to check the results of your bulk upload.
On the Organization Imports tab, you see information about your upload, including the system-generated Import ID number, who imported the list, and when it was imported.
- Click the Import ID number of the organization import to open the Import Details page.
There are two main sections on the Import Details page:
- Import details, which includes the import ID, jurisdiction name, who created it, and the date created.
- Files table, which includes two files: a Result Log for Bulk Upload and the organization import file you uploaded.
- The Result Log for Bulk Upload file shows the results of your file upload.
- Click the Result Log for Bulk Upload link to open the file.
- Scroll to the right until you see the Status column. The Status column shows whether an organization was added in the system.
- If there were duplicates or missing information in the csv file, you will see an error message telling you why an organization was not uploaded.
- All organizations who have a status of Success are uploaded in the system. Organizations whose statuses include an error message have not been uploaded in the system.
Search and View Organizations
Click the Manage Organizations tab to search for and view details of the organizations you’ve entered in VAMS.
NOTE: You will only be able to view the organizations added in your jurisdiction.
Search for an Organization
The Manage Organizations tab offers multiple ways to search and sort data.
- On the Manage Organizations tab, you can sort by clicking the Arrows in the columns to sort them by the column headers (e.g., name, email) or use the search bar to enter information such as clinic name, clinic POC, email address, or status.
View Details of an Organization in Your Jurisdiction
- Click the name of an organization to see detailed information.
- NOTE: Most fields on the Details page are read-only for the jurisdiction POC.
Manage Organization Users
Click the Manage Users tab to search for and view details of the organization users within your jurisdiction. Select the My Organization Users list view from the drop-down menu.
Add an Organization User to Your Jurisdiction
- Click Add or Update User. In the pop-up window, enter the Email Address of the organization user whom you wish to locate and click Search.
- If this user exists in the system, then their information will be pre-populated, and you will be able to see their associated organization POC role. Click Next.
- You will see a list of all organizations under the jurisdiction; the organization(s) that the user is associated with will be pre-selected. Check the Box next to any organization(s) with which you would like the user to be associated. Click Save.
- If this user does not exist in the system, you will have to enter their information.
- Assign the organization POC role to the user. Click Next.
- Check the Box next to any organization(s) with which you would like the user to be associated. Click Save.
- If this user exists in the system, then their information will be pre-populated, and you will be able to see their associated organization POC role. Click Next.
- Once complete, you will have officially added an organization user to your jurisdiction, with assigned organization(s).
Update an Organization User’s Information
- Check the Box next to the organization user whose information you would like to update and click Add or Update User.
- NOTE: You can only select one user at a time to make changes.
- The user’s email will be pre-populated in the pop-up window. Click Next. The user’s information will be prepopulated.
- Review the organization user’s information and associated role. Click Next.
- NOTE: Unselecting a role under the Add or Update User window will not remove the user from that role.
- You will see a list of all organizations under the jurisdiction. The organization(s) that the user is associated with will be pre-selected. Check the Box next to any additional organization(s) with which you would like the user to be associated. Click Save.
- NOTE: Unselecting an organization will not remove the user from that organization.
- Once complete, you will have officially updated the assigned organization information of an organization user within your jurisdiction.
Remove an Organization User
- Check the Box next to the organization user whom you would like to remove from organization(s) in your jurisdiction and click Remove User.
- In the pop-up window, click Next to confirm that you want to proceed with removing this user from their associated organization(s).
- Unselect the Box(es) next to the organization(s) from which you would like to remove the user and click Yes.
- NOTE: If you remove a user from an organization, the user will be removed from all their roles within that organization.
- Once complete, you will have officially removed the organization user from the organization(s) of your choice within your jurisdiction.
Clinic inventory managers or clinic administrators will submit vaccine inventory requests in VAMS for you to receive and fulfill.
You can view and manage inventory requests from clinics on the Inventory Requests tab. From here, you can access their inventory request record to review request details as well as communicate with clinics about the status of their request.
NOTE: While you will receive inventory requests in VAMS, you will place all vaccine orders from manufacturers outside of VAMS through your existing supply ordering processes.
View and Manage Inventory Requests
- Click the Inventory Requests tab.
The Inventory Requests tab shows you a list of all inventory requests received from clinics in your jurisdiction. The list includes:
- A system-generated inventory request number,
- clinic name,
- product type (vaccine type),
- date requested and required by,
- number of doses requested, and
- the inventory request status
Sort requests on this page by clicking the Arrows in the columns to sort them by the column headers (e.g., clinic name, product, etc.).
Access Inventory Request Record
The inventory request record gives you important details about the inventory request and a way to monitor it and communicate with the requestor.
- Click the Inventory Request Number in the list to access the inventory request record.
From the inventory request record, you can:
- View inventory request details. This section of the record has details about the inventory request.
- Communicate with the requestor. Send the requestor a message by typing in the Post box and clicking Share. When communicating with the requestor, make sure to include relevant information about the shipment. For example, if you split up inventory to send to multiple locations, be sure to communicate the Unit of Sale (UoS) National Drug Code or UoS NDC to the receiving clinics.
- Monitor or follow comments made to your posts. Like you would on a social media platform, click Follow to receive email notifications when the requestor responds to a post that you make in the inventory request record. You will not receive notifications for new posts.
Manage Inventory Status
Jurisdiction POCs can use the inventory request record to manage and update the status of inventory requests.
To change the status of an inventory request from the inventory request record:
- Click Edit in the upper left-hand corner of the page.
- Select the Updated Status of the inventory request. Options include submitted, approved, approved with modifications, waiting on additional information, and rejected.
- Click Save after selecting the status.
NOTE: Users who manage inventory for clinics will see the updated status reflected in the inventory request record but will not have the capability to edit it.
Inventory Management in VAMS: Frequently Asked Questions
Click on the buttons below to go to the corresponding sections in this user manual.
The VAMS guest registration tool is a survey tool that allows individuals to schedule appointments and register in VAMS for themselves or on behalf of a minor as a representative/guardian without creating a VAMS account.
You have two options for navigating guest registration:
- You may either schedule an appointment and then register in VAMS, or
- you may pre-register your information in VAMS and not schedule an appointment (you can then schedule an appointment at a later date).
The second scenario may be useful at clinics that accept walk-in appointments or if you are not yet ready to schedule an appointment. For both options, creating a VAMS account is optional.
First, we will look at recipients’ Option 1: Schedule an appointment and then register.
Answer Prescheduling Question(s)
- Navigate to your jurisdiction’s guest registration landing page
- Review the welcome text on the top of the page and select the Schedule Your Appointment button from the options:
- Schedule Your Appointment
- Select this to schedule your vaccine and/or general appointment by finding a clinic and time slot that works for you.
- Schedule your COVID-19 testing appointment
- Select this to schedule your COVID-19 testing appointment by finding a clinic and a time slot that works for you.
- Manage appointments
- Select this to manage a current appointment, appointment communication from VAMS or update your account information.
- Schedule Your Appointment
To schedule your COVID-19 vaccination appointment:
- Select the State where you want to get vaccinated.
- Select COVID-19 Vaccine from the drop-down menu for appointment type.
- Select the desired Vaccine Type and Dose from the following:
-
- COVID-19 vaccine for adults (ages 12 and above)
- 1st, 2nd, 3rd, or additional dose
- COVID-19 vaccine for children (ages 5-11)
- 1st, 2nd, 3rd, or additional dose
- COVID-19 vaccine for children (ages 6 months to 4 years)
- 1st, 2nd, 3rd, or additional dose
- COVID-19 vaccine for adults (ages 12 and above)
- Check the Box that confirms the above information is accurate and that you meet the eligibility criteria (if scheduling for COVID-19 vaccine additional dose). Select Next.
To schedule your Mpox vaccination appointment:
- Select the State where you want to get vaccinated.
- Select Mpox Vaccine from the drop-down menu for appointment type.
- Select your desired Dose Type.
- Check the Box that confirms the above information is accurate. Select Next.
To schedule your routine vaccination appointment:
- Select the State where you want to get vaccinated.
- Select your desired Routine Vaccine from the drop-down menu for appointment type.
- Select your desired Dose Type (if applicable).
- Check the Box that confirms the above information is accurate. Select Next.
To schedule your general appointment:
- Select the State where you want to schedule a general appointment.
- Select General Appointment from the drop-down menu for appointment type.
- Enter a Brief Description of the reason for your appointment in the box that appears below.
- Check the Box that confirms the above information is accurate. Select Next.
Next Dose Reminders: Frequently Asked Questions
Schedule Your Appointment
- On the Clinic Location page, search for a clinic by entering an Address or ZIP/Postal Code to find clinics nearby. You can filter results to locate a clinic within a 5-, 10-, 20-, 50-, or 100-mile radius of the recipient’s address or ZIP/postal code by clicking the Drop-Down Arrow in the Within
- Click Search and a list of clinics within your selected mile radius will appear.
- NOTE: Only clinics that carry the vaccine product and dose you selected during the prescheduling questions will appear in the search results.
- Click the Name of the clinic where you would like to schedule an appointment, then click the Next button that appears above the list of clinics.
- NOTE: The Next button will only appear once you select a clinic name.
- On the Date and Time page, select an available appointment Date on the calendar located on the left side of the page.
- Select an appointment time by clicking a Time Slot, then click the Next button located in the bottom right corner of the page.
- Review your selected appointment location, date, and time, as well as any notes from the clinic, if provided.
Click Submit to confirm the appointment or click Previous to make any changes.
Register for a Vaccine
To confirm the appointment in the system, you must provide necessary personal information.
- If you do not have an existing account in VAMS, you must provide the required information. Enter the required information on the Existing Account page to move forward with the appointment scheduling process.
- Enter First Name, Last Name, Date of Birth, and one of the following: Email Address, Cell Phone Number, or VAMS system ID.
- Click Continue.
- Click Register at the bottom of the page.
- Enter the requested information on the Guest Registration page. NOTE: Required information is indicated by red asterisks (*) in VAMS.
- Representative/guardian information. If you are a representative or guardian registering on behalf of a recipient, select Yes and enter the required personal information.
- First and last name
- Date of birth
- Sex
- Race and ethnicity
- Home address
- Preferred method of contact (email, SMS, or “I prefer not to receive any communication from VAMS”)
- Preferred language for communications (English or Español)
- Medical history (pregnancy, nursing mother, nursing home resident, allergies, existing conditions)
- Select an option in the Account Information section. Creating an account is optional.
- After entering the information, click Next.
- Review the personal information and insurance information (if applicable) for accuracy. If any information is inaccurate, click Previous to make edits before moving forward.
- Confirm all information is correct and complete, then check the Box that you agree the information is correct.
- Click Submit. A pop-up box will emerge asking for a verification code that has been sent to your preferred email/phone number. Enter the Verification Code and select Verify.
- After Submitting and Verifying, you will see a confirmation that the appointment has been scheduled. The confirmation includes the appointment details and a QR code the front desk can use to check you in upon arrival at the clinic.
Pre-Register for a Vaccine
Now, we will look at recipients’ guest registration Option 2: Pre-register without scheduling an appointment.
- Navigate to your jurisdiction’s Guest Registration landing page and click the link at the bottom that says, “Enter your information to pre-register.”
- Confirm you do not already have a VAMS account by entering your First Name, Last Name, Date of Birth, and one of the following: Email Address, Cell Phone Number, or VAMS System ID.
- Once you’ve entered your information, click Continue.
- If you do not have a VAMS account, the system will say your information is not on file and you will see a Register Click this button to proceed.
- If you do already have a VAMS account, you do not need to pre-register, as you are already registered in VAMS. The system will send a verification code to your preferred contact method. Enter this code on the screen and click Verify. You can then proceed with scheduling a vaccination appointment.
- Enter all required information, marked by a red asterisk (*), then click Next.
- VAMS will send a verification code to your preferred contact method. Enter this Code in the pop-up window and click Verify.
- Review your information and check the Box at the bottom of the screen, confirming the information is accurate, then click Submit.
You are now pre-registered! You can click the Schedule Your Appointment button if you are ready to schedule an appointment now, or simply return to the Guest Registration login screen at a later date and click the Schedule Your Appointment (as applicable).
Self-Registration for Vaccination: Frequently Asked Questions
Click on the buttons below to go to the corresponding sections in this user manual.
About Assisted Scheduling with a Jurisdiction Contact Center
The Jurisdiction Contact Center allows jurisdictions to add a group of contact center agents to VAMS. They can then use VAMS to schedule and manage recipient appointments.
Gaining Access to the Jurisdiction Contact Center Feature
Jurisdiction POCs who would like to use the Jurisdiction Contact Center feature for assisted scheduling in VAMS should reach out to their onboarding specialist to gain access to the contact center manager user role. You will not be able to use the contact center functionality until you have contact center manager permissions.
Contact Center User Roles
The Jurisdiction Contact Center has two main user roles: contact center managers and contact center agents.
- Contact center managers are jurisdiction points of contact added by the VAMS operations team who can add agents to their jurisdiction’s contact center using the Manage User tab in the Jurisdiction Portal. They also have access to the Manage Recipients tab to schedule appointments on behalf of recipients.
- Contact center agentsare individuals added by the jurisdiction points of contact who can schedule appointments on behalf of recipients using the Manage Recipients tab. They will have access to this tab via the Contact Center Agent Portal.
Managing Contact Center Users
Click the Manage Users tab to search for and view details of the contact center users within your jurisdiction. Select the My Contact Center Users list view from the drop-down menu.
Add a Contact Center User to Your Jurisdiction
- Click Add or Update User. In the pop-up window, enter the Email Address of the contact center user whom you wish to locate and click Search.
- If this user exists in the system, then their information will be pre-populated, and you will be able to see their associated contact center role. Click Save.
- If this user does not exist in the system, you will have to enter their information.
- Assign the contact center role to the user. Click Save.
- Once complete, you will have officially added a contact center user to your jurisdiction.
Update a Contact Center User’s Information
- Check the Box next to the contact center user whose information you would like to update and click Add or Update User.
- NOTE: You can only select one user at a time to make changes.
- The user’s email will be pre-populated in the pop-up window. Click Next. The user’s information will be prepopulated.
- Review the contact center user’s information and associated role. Click Save.
- NOTE: Unselecting a role under the Add or Update User window will not remove the user from that role.
Remove a Contact Center User
- Check the Box next to the contact center user whom you would like to remove from the jurisdiction contact center and click Remove User.
- In the pop-up window, click Remove to confirm that you want to proceed with removing this user from the jurisdiction contact center.
- Once complete, you will have officially removed the contact center user from the jurisdiction contact center.
Scheduling Appointments on Behalf of Recipients
Both contact center managers and agents can register recipients for vaccination appointments via the Manage Recipients tab. Search for the recipient’s record by entering their Email Address, Cell Phone Number, VAMS ID, or External System ID, or by entering their First and Last Name and Date of Birth. Click Search.
- If they are an existing recipient, select the Box next to their name in the search results table. Then click Schedule Future Appointment.
- Select the appointment(s) you want to schedule for. Options include COVID-19 vaccine, Mpox vaccine, routine vaccines, and general appointment. Click Continue.
-
- If you selected COVID-19 Vaccine:
- Choose the Dose you are scheduling for and click Continue.
- If there are no existing scheduled appointments, click Schedule Future Appointment.
- NOTE: VAMS will check for any existing appointments for the recipient and notify you of any conflicting appointments before scheduling. You can either keep or cancel an existing appointment for the recipient.
- Answer any pre-scheduling questions and click Continue.
- If you selected Mpox Vaccine:
- Choose the Dose you are scheduling for, answer any pre-scheduling questions, and click Continue.
- If there are no existing scheduled appointments, click Schedule Future Appointment.
- NOTE: VAMS will check for any existing appointments for the recipient and notify you of any conflicting appointments before scheduling. You can either keep or cancel an existing appointment for the recipient.
- If you selected a Routine Vaccine:
- Choose the Dose you are scheduling for, answer any pre-scheduling questions, and click Continue.
- If there are no existing scheduled appointments, click Schedule Future Appointment.
- NOTE: VAMS will check for any existing appointments for the recipient and notify you of any conflicting appointments before scheduling. You can either keep or cancel an existing appointment for the recipient
- If you selected General Appointment:
- Choose the Reason for your appointment from the provided list. If you choose Other, briefly describe the reason for your appointment in the space provided. Click Continue.
- Click Schedule Future Appointment.
- If you selected COVID-19 Vaccine:
- Search for a clinic to view available appointments. When the clinic list view populates, select a Clinic and click Next.
- NOTE: When scheduling an appointment for a recipient, VAMS will only show clinics carrying the applicable vaccine offering for the recipient.
- Select an available Date and Time for the appointment and click Next.
- Confirm the appointment information and click Submit to book the appointment. VAMS will send an appointment confirmation to the recipient’s preferred method of contact.
If the potential vaccine recipient does not have an existing account in VAMS, they will not appear in search results. Instead, contact center users will use the Manage Recipients tab to enter their information in VAMS, create their VAMS account (optional), and then schedule their appointment.
- Click Add New Recipient at the bottom of the Search
- Enter the Recipient Information. Fields marked with an asterisk are required. You must select Yes or No as to whether you’d like to associate the new recipient with a representative or guardian. If you select Yes, enter the representative or guardian’s First and Last Name and Date of Birth.
- Email address and cell phone number are optional. If you enter either an email address or cell phone number, you are asked to select the recipient’s preferred contact method and preferred language for messages (English or Spanish).
- If you enter an email address or cell phone number, you are also given the option to create a VAMS account for them. If you select Yes, they will receive a notification to create a VAMS password and begin activating their account.
- If you enter a cell phone number and select Yes to creating a VAMS account, you are prompted to provide a one-time multi-factor authentication code that is sent to the cell phone number provided. Ask the recipient to provide the authentication code they received, enter the Code, and click Confirm.
- If you attempt to create a VAMS account for a user with a preferred method of contact that is already associated with an existing VAMS account, you will receive an error message. The system will ask you to change the preferred contact method in order to register a new account or choose not to create an account and proceed as a guest.
- Entering insurance information is optional. Whether you enter information or leave the fields blank, click Next to continue.
- Click Next after entering all recipient information.
- Review the information and check the Box confirming it is correct. Click Submit.
- On the confirmation screen, select Schedule Future Appointment on the confirmation page. Follow the same process listed under the existing recipient portion above to schedule the recipient’s appointment.
NOTE: VAMS will check for duplicate recipients and will not allow you add a user already added in VAMS. The system will also check for any existing appointments for the recipient and notify you of any conflicting appointments before scheduling. You can either keep or cancel an existing appointment for the recipient.
Multiple Dose Appointment Reservations
If the clinic where a contact center user is scheduling a recipient’s appointment allows for multiple dose appointment reservations, the contact center user can schedule a second dose appointment for the recipient immediately after scheduling their first dose appointment. If the recipient already has an active second dose appointment, the Conflicting Appointment Screen will display. The contact center user can choose to keep or cancel the existing appointment.
NOTE: VAMS will automatically cancel a second dose appointment if the recipient’s first dose appointment is cancelled, rescheduled, or if the recipient receives the Janssen (Johnson & Johnson) vaccine at their first appointment.
Managing Recipient Information
Contact center managers and agents can edit recipient records.
- On the Manage Recipients tab, search for a registered recipient to edit their record.
- Once you’ve located the recipient, click their Name in the search results table to be taken to their Record Detail
- Click Edit Information to edit the recipient’s contact information, demographics, emergency contact, or insurance information.
NOTE: You cannot edit the recipient’s vaccination record, such as date of vaccination, vaccine manufacturer, lot number, etc.
Contact center managers can download and print vaccination certificates for recipients. Contact center agents do not have this functionality.
- Navigate to the Manage Recipients tab within the Jurisdiction Portal.
- Search for the applicable recipient and select the Checkbox next to their name.
- Click the View Vaccination Certificate Note that this button will only be present once you select the Checkbox next to the recipient’s name and the recipient received at least one dose of vaccine.
- The vaccination certificate will open in a new window.
- To generate a PDF of and/or print the vaccination certificate, click the Print icon.
Accessing Vaccination Certificates: Frequently Asked Questions
The boxes below are clickable links to the corresponding sections in this user manual.
About Jurisdiction Dashboards and Reports
Only jurisdiction points of contact (POCs) with a dashboard license can access these dashboards.
Jurisdiction dashboards and reports allow jurisdiction POCs to view, sort, and filter data from clinics across their jurisdiction. They include data on:
- Doses Administered
- Registration
- Inventory
- Appointments
Jurisdiction Data Reports: Frequently Asked Questions
Accessing Jurisdiction Data Reporting Dashboards
From your VAMS Jurisdiction Portal home page, navigate to the Jurisdiction Data tab. Click View All Dashboards to view all the dashboards and reports that are available for your jurisdiction.
You can navigate through dashboards by clicking the different tabs at the top of your screen. Once at each dashboard, scroll down to review the reports included.
Types of Dashboards: Doses Administered
The Doses Administered dashboard includes the following reports:
- Total number of doses administered
- Total number of initial doses administered
- Total number of follow-up doses administered
- Total number of additional doses administered
- Proportion of vaccine series completion
- Doses administered by gender
- Doses administered by race/ethnicity
- Doses administered by age group
- Doses administered by clinic type
- Doses administered by priority group
- Doses administered by state
- Initial Doses, follow-up doses, and total doses administered by clinic
Doses Administered reports can be filtered by:
- Vaccination dose date (e.g., all, before/after/between dates, relative dates)
- Vaccination type
- Clinic (e.g., all, Jefferson Clinic, Main St. Clinic)
Types of Dashboards: Registration
The Registration dashboard includes the following reports:
- Total number of recipients notified through Organizations
- Total number of recipients that were notified
- Total number of recipients registered
- Total number of organizations with enrollments
- Total number of activated clinics
- Total number of deactivated clinics
Total number of recipients registered through each registration pathway: Organizations, Flexible (Open) Registration, Contact Center, Standard and Mobile Clinics, Third-Party Clinics, and Guest Registration.
Registration reports cannot be filtered.
Types of Dashboards: Inventory
The Inventory dashboard includes the following reports:
- Total number of doses delivered
- Total number of requested vaccine doses
- Total number of vaccine doses successfully administered
- Total number of doses removed
- Total number of doses wasted
- Total number of vaccine doses part of inventory
- Percentage of available vaccines administered
- Number of doses wasted
- Total number of doses logged in error
- Number of vaccine doses removed by reason
Inventory reports can be filtered by:
- Clinic (e.g., all, Jefferson Clinic, Main St. Clinic)
- Vaccination type
Types of Dashboards: Appointments
The Appointments dashboard includes the following reports:
- Average appointment duration
- Total number of scheduled appointments
- Number of cancelled appointments
- Number of completed appointments
- Number of cancelled appointments by cancellation reason
Appointment reports can be filtered by:
- Timeframe (e.g., date range)
- Clinic (e.g., all, Jefferson Clinic, Main St. Clinic)
- Vaccination type
Types of Dashboards: Admin Reports
The Admin Reports dashboard includes the following dashboards:
- Clinics
- Organizations
- Clinic Capacity
- Recipient Vaccinations
- COVID-19 Tests
The Clinics dashboard includes the following reports:
- Total number of active clinics
- Total number of third-party clinics
- Total number of pending clinics
- Total number of inactive clinics
- Total number of COVID-19 Testing Clinics
Clinic Admin reports cannot be filtered.
The Organizations dashboard includes the following reports:
- Total organizations
- Total number of active organizations
- Total number of pending organizations
- Total number of inactive organizations
- # of recipients notified
- # of recipients registered
Organization reports can be filtered by:
- Organization name (e.g., all ASPR Employees, Michigan Health Department)
The Clinic Capacity dashboard includes the following reports:
- Total capacity
- Total number of booked appointments
- Total available appointments
- Total completed appointments
- Total canceled appointments
- Total checked-in appointments
- Total past checked-in appointments
Clinic Capacity reports can be filtered by:
- Clinic name (e.g., all, Jefferson Clinic, Main St. Clinic)
To view a detailed report within any of these dashboards, click the Tile Header.
NOTE: To ensure that the Clinic Capacity dashboard is up to date at time of viewing, click the Refresh button in the top right corner of the dashboard.
The Recipient Vaccinations dashboard includes the following reports:
- Number of 1st dose recipients
- Number of 2nd dose recipients
- Recipients with a 2nd dose needed
- Number of additional dose recipients
- Recipients who have completed their vaccination
Recipient Vaccinations reports can be filtered by:
- Clinic name (e.g., all, Jefferson Clinic, Main St. Clinic
- Vaccination date
The COVID-19 Tests dashboard includes the following reports:
- Number of Diagnostic Lab Test- PCR (Molecular-PCR SARS CoV2)
- Number of Rapid Diagnostic Test (IDNow Rapid COVID-19 PCR)
- Number of Rapid Antigen Test (BinaxNOW Rapid COVID-19 Antigen)
- Number of COVID-19 Antibody (SST)
COVID-19 Tests reports can be filtered by:
- Clinic name (e.g., all, Jefferson Clinic, Main St. Clinic
- Vaccination date
NOTE: You can use the past checked-in appointments report to help manage recipients caught in the Checked-In status and ensure their records are completed or their appointments are cancelled.
Types of Dashboards: Einstein Reports
The Einstein dashboard includes:
- The same reports discussed in previous dashboards
- Additional ways to tailor and export the data
Einstein reports can becustomized by using the Explore feature.
- In any dashboard, hover over a dataset until you see the drop-down arrow. Click the Arrow, then select Explore.
- The default mode upon clicking Explore is Chart Mode. From here, you can visualize your data by clicking the Chart icon on the right side of your screen and selecting from a variety of charts available. You can also customize charts by clicking the Formatting icon below the chart icon.
- In Table Mode, you can also use the Formatting feature to customize tables. Once in Table Mode, click Values Table. Default values are shown on the left. Scroll down and click the Pencil icon to add additional values.
- In Query mode, both the Chart and Formatting features are available.
Viewing Jurisdiction Dashboards: Frequently Asked Questions
Downloading Reports
You can download select VAMS reports as images, Excel workbooks, or CSV files.
- Hover your mouse over a report to see if it is downloadable. If a small arrow appears in the corner of the report, you can click the Arrow, click Share, then navigate to the Download tab to view your download options.
You can modify select dashboards by clicking on data within certain reports.
- For example, from the Doses Administered dashboard, clicking on the Female bar in the Doses Administered by Gender report will update the rest of the reports on the dashboard to only show information for females in your jurisdiction.
You can revert to your original view by clicking the Circular Arrow next to the Modified button in the top left corner of the screen.
You can print reports using your internet browser’s print options or once downloaded to your device.
Exporting Einstein Reports
- On the Jurisdiction Data tab, click View All Dashboards.
- In the upper right corner, click on the Open in Analytics Studio
- Once redirected, hover over a dataset until you see the drop-down arrow. Click the Arrow, then select Explore.
- Once inside the Explore lens, you can sort the data as desired. Export the data by clicking the Down Arrow in the upper right corner, then click Share. In the pop-up window, select the Download tab to choose a download format (image, Excel, or CSV).
- The lens defaults to a limit of 100 records. To increase this count, increase the Query Limit by scrolling down in the left-hand section of the lens and select Edit under Query Limit Default. Enter 10,000 and click Apply.
Filtering and Modifying Dashboards
Select dashboards can be filtered using the dropdowns at the top of the screen. If a dashboard cannot be filtered, it will not have dropdowns.
Select reports can be downloaded as images, Excel workbooks, or .csv files.
- Hover your mouse over a report to see if it is downloadable.
- If a small arrow appears in the corner of the report, you can click the Arrow, click Share, then navigate to the Download tab to view your download options.
Select dashboards can be modified by clicking on data within certain reports.
- For example, from the Doses Administered dashboard, clicking the 25-34 age group in the Doses Administered by Age Group report will update the rest of the reports on the dashboard to only show information for that age group in your jurisdiction.
- You can revert to your original view by clicking the Circular Arrow next to the Modified button in the top left corner of the screen.
VAMS Downtime Procedures
VAMS is occasionally taken down for scheduled system maintenance. All VAMS functions are unavailable for all users during these scheduled downtimes. You will be notified prior to scheduled system downtimes.
All users should consider any processes they may need to complete prior to the downtime, such as:
- Reviewing inventory requests
- Downloading data reports
- Viewing/printing vaccination certificates
QUICK TIP: If you need help with access to vaccination certificates, visit the quick reference guide, “Accessing Vaccination Certificates in VAMS”.
User Access Support
Quick Tip: Some users may not be able to access VAMS and may request your help in gaining access. A quick reference guide on troubleshooting for user access is available with a list of solutions. Additional FAQs about accessing VAMS can be found on the “Getting Started in VAMS” page. You can also find support within VAMS by clicking the Help Link in the upper right corner of the navigation bar.
Submit a Question to the VAMS Help Desk
- From the Help page, click Submit a Question.
- Click Submit a Case and select New Clinic Case.
- When logged into the system, your name and email address will be prepopulated in your case.
- Select the Category of your question (and Subcategory, if applicable), select your Jurisdiction, type the Subject of your question, then type your Question in the text box.
- After clicking Confirm, a message will appear on the screen confirming your question was sent.
- Once you receive a response to your question, you can communicate back and forth with the support team by replying to the email.
NOTE: Do not edit the subject line of the email or the support team member who initially responded to your question will not receive it.
For additional support, complete the contact form for the VAMS Help Desk.
Toll-Free Number | +1 833-748-1979
Email: CARS_HelpDesk@cdc.gov
Hours of Operation | 8:00 AM – 8:00 PM EST | Monday – Friday